Quantcast
Channel: TeeJeeTech
Viewing all 136 articles
Browse latest View live

Aptik Battery Monitor

$
0
0
The first version of Aptik Battery Monitor is now available. This is a small utility that displays the stats for your laptop battery such as the charge level and the discharge rate. The graph displays the battery charge level (black line) and the CPU usage (red line).


Installation

Ubuntu

If you are using the following Ubuntu releases (or any of its derivates like Kubuntu, Xubuntu, Linux Mint) then you can install it from the LaunchPad PPA:
  • Ubuntu 15.10 (wily)
  • Ubuntu 15.04 (vivid)
  • Ubuntu 14.04 (trusty)
Run the following commands in a terminal window:
sudo apt-add-repository -y ppa:teejee2008/ppa
sudo apt-get update
sudo apt-get install aptik-bmon

Other Linux Distributions

Download the installer from following links:
aptik-bmon-latest-i386.run (32-bit, 350 KB)
aptik-bmon-latest-amd64.run (64-bit, 350 KB)

Run it from a terminal window using the following commands:
./aptik-bmon-latest-i386.run  #32-bit
./aptik-bmon-latest-amd64.run #64-bit

Depending on the distribution that you are using, you may need to install packages for the following dependencies:
libgee-0.8 json-glib 

Un-Install

Run the following command in a terminal window:
sudo apt-get remove aptik-bmon


Selene v2.6.1

$
0
0
Some long-standing bugs were fixed in Selene v2.6.1. Thanks to everyone who sent in bug reports.

Fixes:
  • If video frame rate is fractional, then audio-video is out-of-sync for H264 videos (#1448667)
  • Input file properties were not parsed correctly for some files. These files would give a 'format not supported' error when added to the input list

Install or Update

Users of Ubuntu 14.04 (trusty), 15.04 (vivid), 15.10 (wily), 16.04 (xenial) can install it from my PPA:

sudo apt-add-repository -y ppa:teejee2008/ppa sudo apt-get update sudo apt-get install selene

DEB packages for other Ubuntu distributions:

selene-latest-i386.deb (32-bit, 300 KB)
selene-latest-amd64.deb (64-bit, 300 KB)

Installers for non-Ubuntu distributions:

selene-latest-i386.run (32-bit, 600 KB)
selene-latest-amd64.run (64-bit, 600 KB)

Run the installer with following commands:

sh ./selene-latest-i386.run  #32-bit sh ./selene-latest-amd64.run  #64-bit

TimeShift FAQ

$
0
0

Q: Why is the home directory excluded from snapshots?

The home directory is excluded for following reasons.

  • The home directories of most users contain several GBs of music, videos and other files. Taking snapshots of this data will waste space on the backup device.
  • Documents in the home folder may get overwritten with older files when previous snapshots are restored.

Excluding the home directory avoids these two issues.

Q: What about user settings which are present in home directory?

Settings which are specific to a user are kept in hidden files and directories (starting with a period) in the user's home directory. These files and directories are included by default. Only non-hidden files and directories are excluded.

Q: I have some folders in my home directory that I want to include in my snapshots.

You can add it to the list of included paths (from the settings window) but please remember that these files will get overwritten when you restore a snapshot. TimeShift is designed to protect your system files and settings. If you need an application to help you take backups of documents, photos and other user files, please take a look at other tools like BackInTime.

Q: How do I exclude my Windows partition before taking a snapshot?

It's already excluded. External partitions are mounted under /mnt and /media which are excluded by default.

Q: Do I need to exclude something manully?

The default exclude list is good enough for almost all users. Excluding folders manually will be required only if you have a very customized system. For example, if you have some partitions mounted in non-standard locations (outside of /mnt and /media) then you need to add it to the exclude list.

Q: My disk is running out of space!

If the backup device runs out of space very quickly, please try the following:

  • Reduce the number of backup levels - Enable the boot backup level and disable the others.
  • Reduce the number of snapshots that are kept - In the Auto-Remove tab set the limit for boot snapshots to 5 or less.
  • You can also disable the scheduled snapshots completely.

There may be other reasons why your disk is filling up. If you have any partitions mounted outside of /mnt and /media you need to add the mount path to the exclude list. You can also check the rsync log for a particular snapshot using the toolbar button. It contains the list of files that changed from the previous snapshot.

Q: How can I free disk space again after un-installing Timeshift?

To delete all snapshots, run the application, select all snapshots from the list (CTRL+A) and click the Delete button on the toolbar. This will delete all snapshots and remove the /timeshift folder in the root directory. You can also delete the timeshift directory manually if you have already un-installed the application.

Q: I upgraded my system and now my system boots to a black screen. How can I restore the snapshots?

Boot from the Ubuntu LiveCd and install TimeShift using apt-get or using the installer. Now you can use TimeShift to restore a snapshot from the backup device.

Q: Is re-installing the bootloader really needed for restoring a snapshot?

It is not necessary but it ensures that your system is bootable after restore is complete.

When you install GRUB while installing your OS, the disk location of the GRUB stage files (in /boot) are stored in the MBR. If there is any change to the files in /boot directory after installing GRUB, the system will fail to boot.

Restoring a snapshot can sometimes change the files in the /boot directory. If the bootloader is not re-installed then there is a small chance that the restored system will fail to boot. Reinstalling grub is completely safe and ensures that your system is bootable after restore is complete.

Q: Where are the backups kept?

Backups are kept under a folder named timeshift in the root of the backup device. This path cannot be changed.

Q: Does it support LVM volumes?

Yes. To use an LVM volume as backup device, select it from the backup device dropdown.

Q: Does it support BTRFS volumes?

Yes, but only if the volume has an ubuntu-type layout (with @ and @home sub-volumes).

Q: When are you planning to add support for BTRFS snapshots?

BTRFS snapshots are a completely different concept and I have no plans to add support for this. For taking BTRFS snapshots, I'm planning to create another application named TimeShift-BTRFS. This new application will create only BTRFS snapshots and can be used only with BTRFS file systems.

Q: I need a feature added to TimeShift

Leave a comment on my blog or add a feature request in the bug tracker and I'll add it to my To-Do list. If you need the feature urgently please contact me by email. I can implement the required changes for a small fee.

Any other questions? Please leave a comment below.

Battery Monitor v2

$
0
0
Battery Monitor is a utility to monitor the battery life of your laptop. I got some time this weekend to make some improvements.


What's New

* Log file will be rotated when laptop is removed from charger
* Charging rate and time left to charge will be displayed when connected to charger
* New UI layout
* The UI can be run as a normal user. Admin access is not required.

Remove Previous Version (Important)

The previous version needs to be removed before installing this version as the package name has changed. Run the following commands to remove the previous version.

Uncheck the 'Enable logging' checkbox on the main window.


Run the following command to remove the package completely.

sudo apt-get remove aptik-bmon


Installation


Ubuntu based distributions

If you are using the following Ubuntu releases (or any of its derivates like Kubuntu, Xubuntu, Linux Mint) then you can install it from the LaunchPad PPA:
  • Ubuntu 16.04 (xenial)
  • Ubuntu 15.10 (wily)
  • Ubuntu 15.04 (vivid)
  • Ubuntu 14.04 (trusty)
Run the following commands in a terminal window:
sudo apt-add-repository -y ppa:teejee2008/ppa
sudo apt-get update
sudo apt-get install aptik-battery-monitor

Other Linux Distributions

Download the installer from following links:
aptik-battery-monitor-latest-i386.run (32-bit, 200 KB)
aptik-battery-monitor-amd64.run (64-bit, 200 KB)

Run it from a terminal window using the following commands:
./aptik-battery-monitor-latest-i386.run   #32-bit
./aptik-battery-monitor
-latest-amd64.run #64-bit

Depending on the distribution that you are using, you may need to install packages for the following dependencies:
libgee-0.8 json-glib 

Un-Install

Run the following command in a terminal window:

sudo apt-get remove aptik-battery-monitor


Aptik v2.0

$
0
0
Aptik v2.0 is now available. This is a major release with many new improvements.


Changes

Backup and Restore for Non-Native packages

If you are running a 64-bit Linux distribution then most of the packages on your system will be 64-bit. Your system will also have some 32-bit packages installed for compatibility with games and other software which don't have 64-bit versions available.

Aptik will now also list 32-bit packages, so that they can be backed-up and re-installed on the new system.


Package Status & Section Filters

The status dropdown now displays more options for filtering the package list.


  • Installed (dist) - All packages that came with your OS.
  • Installed (user) - All extra packages installed by you. Dependency packages will not be displayed. For example, if you installed package A on your system, and packages B, C, D were installed along with A (as dependencies), then only A will be listed.
  • Installed (auto) - All packages that were installed automatically for satisfying the dependencies of extra packages that were installed by you. Displays B, C, D from the above example.
  • Installed (deb) - All packages that were installed from downloaded DEB files.
  • NotInstalled - All packages that are not installed but available for installation.

There's a new "Section" dropdown for filtering the packages based on category. For example, if you select the "kernel" section you can see the packages for the installed Linux kernels.


DEB File Backup & Restore

Aptik will now warn you if there are any packages on your system which were installed from DEB files.


If you have the DEB files for these packages, you can drag and drop the DEB files on the window to save them in the backup location. These DEB files will be used for re-installing the packages during restore.


New Package Download Window

There's a new download window for downloading packages using aria2. aria2 is a multi-threaded download manager which can download packages more quickly by opening multiple connections for each file. Multiple packages will be downloaded simultaneously to max-out the available bandwidth.


GUI Improvements

PPA restore progress will be displayed in a GUI instead of a terminal window.


Improvements for App Settings Backup 

Selected items were previously saved as a single app-settings.tar.gz file in the backup location. This made it difficult to delete the data for unneeded items.

App settings will now be saved as separate TGZ archives. This will allow you to delete individual items from the backup location manually.

New command line options --list-configs, --backup-configs, --restore-configs have been added. The --backup-configs and --restore-configs commands should be used carefully as they will backup and restore **ALL** config directories in your home directory.

New App Icon

The main app icon has been changed. This awesome new icon was created for Aptik by the designers of the Numix Circle theme.


Installation and Updates

Aptik can be installed by running the following commands in a terminal window:

sudo apt-add-repository -y ppa:teejee2008/ppa
sudo apt-get update
sudo apt-get install aptik
Existing users can update the application with the following commands:

sudo apt-get update
sudo apt-get install aptik

Donate

This application is completely free and will continue to remain that way. Your contributions will help in keeping this project alive and improving it further. Feel free to send me an email if you find any issues in this application or if you need any changes. Suggestions and feedback are always welcome.

If you want to buy me a coffee or send some donations my way, you can use Google wallet or Paypal.

You can send your donation via Google Wallet to teejeetech at gmail dot com.

You can also donate with Paypal

Aptik v2.1 - Screenshot Gallery

$
0
0

Main Window
Restore Software Sources (PPAs)
Restore PPA Progress

Restore Downloaded Packages in APT Cache

Restore Packages

Restore Packages - New Download Manager powered by aria2

Restore Packages - Last step
Backup Application Settings

Backup Themes

New App Icon (Numix Circle theme)

Selene v16.2.1

$
0
0
Selene 16.2.1.md

Selene v16.2.1

What's New

AAC Encoders

FFmpeg’s native AAC encoder has been steadily improving and now produces audio with quality comparable to other AAC encoders. It was recently marked as stable and is no longer considered experimental. The quality of available AAC encoders now looks like this:
Fraunhofer FDK AAC (libfdk_aac) > Nero AAC > FFmpeg’s Native AAC encoder (aac) > libfaac > libvo_aacenc

Support has been added to Selene for encoding audio with FFmpeg’s AAC encoder and the Fraunhofer FDK AAC encoder (libfdk_aac). Using Nero AAC is not recommended anymore as development seems to have stopped. libfdk_aac gives better quality and can be easily installed from the Ubuntu repositories. Install the libfdk-aac0 package on your Ubuntu system to get the encoder.

sudo apt-get install libfdk-aac0

There’s a new option to change the AAC profile. It is recommended to keep this as ‘Auto’ which defaults to AAC-LC. AAC-LC is suitable for all general purpose encoding tasks while HE-AAC/HE-AACv2 is suitable for encoding at low bitrates (64 kbps and lower).

FFmpeg/Libav

If you have been following the FFmpeg/Libav scene since it started, then you must be aware that it’s about to get a little more confusing. Debian/Ubuntu has abandoned Libav and will be going back to FFmpeg for future Debian/Ubuntu releases.

This means the avconv tool created by Libav will no longer be available, and will be replaced by the ffmpeg command again. There’s a new option in the application settings window to specify the tool to use for encoding tasks. It’s recommended to set this to ffmpeg unless you are still using avconv.

Update your system with the following commands to switch over to ffmpeg:

sudo apt-get purge libav-tools
sudo apt-get install ffmpeg

In case you are planning to stick with Libav, keep in mind that Libav has not been keeping up with FFmpeg’s pace of development. FFmpeg now supports more codecs than Libav. FFmpeg merges most changes from Libav while Libav rarely merges changes from FFmpeg. FFmpeg fixes security issues as soon as they are reported while Libav is very slow to address security issues. The Libav development is going to slow down further after being abandoned by Debian/Ubuntu.

Version Numbers

Selene’s version number has been changed to match the scheme used by Ubuntu. For example, the current release is 16.2.1 which indicates:
16 -> 2016 (Year)
.2 -> Feb (Month)
.1 -> First update of the month

Installation

Ubuntu-based Distributions (Ubuntu, Linux Mint, etc)

Packages are available in the Launchpad PPA for supported Ubuntu releases. Run the following commands in a terminal window:

sudo apt-add-repository -y ppa:teejee2008/ppa
sudo apt-get update
sudo apt-get install selene

For older Ubuntu releases which have reached end-of-life, you can install Aptik from the DEB files linked below.
selene-latest-i386.deb (32-bit)
selene-latest-amd64.deb (64-bit)

Debian

DEB files are available from following links:
selene-latest-i386.deb (32-bit)
selene-latest-amd64.deb (64-bit)

Other Linux Distributions

An installer is available from following links:
selene-latest-i386.run (32-bit)
selene-latest-amd64.run (64-bit)

Removal

Run the following commands in a terminal window:

sudo apt-get purge selene

Donations

If you want to buy me a coffee or send some donations my way, you can use Google wallet or Paypal to send a donation to teejeetech at gmail dot com.

Donate with Paypal

Donate with Google Wallet

Selene v16.2.2

$
0
0
Selene 16.2.2.md

Selene v16.2.2

What’s New

Support for adding folders

Folders can now be added to the file list using the toolbar button or via drag-and-drop. All media files in the folder will be added recursively to the file list.

Customizable Columns

More columns can be added to the list view for displaying file properties like File Format, Audio Bitrate, Video Framerate, etc. Right-click on the file list and click the ‘Columns…’ menu item to customize the visible columns.

Select the columns to display. Drag the items up and down to re-order.

Columns can be re-arranged by dragging:

‘Add File’ Progress

A progress dialog will be displayed when files are added to the list.

Libav / FFmpeg Dependency

The last update could not be installed on Ubuntu 14.04 since the ‘ffmpeg’ package was added as a dependency which is not available in the repositories. This has been corrected. Updating/installing Selene will install either libav-tools or ffmpeg whichever is available.

Installation

Ubuntu-based Distributions (Ubuntu, Linux Mint, etc)

Packages are available in the Launchpad PPA for supported Ubuntu releases. Run the following commands in a terminal window:

sudo apt-add-repository -y ppa:teejee2008/ppa
sudo apt-get update
sudo apt-get install selene

For older Ubuntu releases which have reached end-of-life, you can install Aptik from the DEB files linked below.
selene-latest-i386.deb (32-bit)
selene-latest-amd64.deb (64-bit)

Debian

DEB files are available from following links:
selene-latest-i386.deb (32-bit)
selene-latest-amd64.deb (64-bit)

Other Linux Distributions

An installer is available from following links:
selene-latest-i386.run (32-bit)
selene-latest-amd64.run (64-bit)

Removal

Run the following commands in a terminal window:

sudo apt-get purge selene

Donations

If you want to buy me a coffee or send some donations my way, you can use Google wallet or Paypal to send a donation to teejeetech at gmail dot com.

Donate with Paypal

Donate with Google Wallet


Selene v16.2.4

$
0
0
Selene 16.2.4

Selene v16.2.4

What’s New

Improved Video Cropping

The cropping feature has been updated. To crop videos in batch mode, click the ‘Crop’ button on the toolbar.

This opens a window where the cropping parameters can be set manually for videos in the file list.

Click on the ‘Edit’ icon to open the cropping window.

The cropped area is displayed inside a white rectangle. Adjust the rectangle by changing the cropping parameters. The area can be adjusted more easily by moving the mouse over the input box and scrolling with the mouse wheel. Click the ‘Detect Borders’ button to automatically detect black borders in the video and fill-in the cropping parameters.

You can also open the crop window by right-clicking a video in the main file list.

Background Processing

Click the ‘Background’ button on the progress window to move all encoding tasks to the background. Selene will switch all encoders to a higher ‘nice’ value, so that you can continue working on other things while the files are being converted. You will be notified once the tasks are completed.

This feature was present in previous versions of Selene but was available only in admin mode. This option is now available for non-admin users also.

Media Player

A simple mplayer frontend has been added to play audio/video files. This removes dependency on ffplay, avplay and other players. MPlayer needs to be installed for the player to work.

Installation

Ubuntu-based Distributions (Ubuntu, Linux Mint, etc)

Packages are available in the Launchpad PPA for supported Ubuntu releases. Run the following commands in a terminal window:

sudo apt-add-repository -y ppa:teejee2008/ppa
sudo apt-get update
sudo apt-get install selene

For older Ubuntu releases which have reached end-of-life, you can install Aptik from the DEB files linked below.
selene-latest-i386.deb (32-bit)
selene-latest-amd64.deb (64-bit)

Debian

DEB files are available from following links:
selene-latest-i386.deb (32-bit)
selene-latest-amd64.deb (64-bit)

Other Linux Distributions

An installer is available from following links:
selene-latest-i386.run (32-bit)
selene-latest-amd64.run (64-bit)

Removal

Run the following commands in a terminal window:

sudo apt-get purge selene

Donations

If you want to buy me a coffee or send some donations my way, you can use Google wallet or Paypal to send a donation to teejeetech at gmail dot com.

Donate with Paypal

Donate with Google Wallet

Selene v16.2.5

$
0
0
Selene 16.2.5.md

Selene v16.2.5

What’s New

Trim Duration

It is now possible to encode only a portion of the input file.
Right-click on the file in the main list and select ‘Trim Duration…’.

Play the file and set the start and end points.

Click the ‘Advanced’ button to switch to the advanced view where multiple segments can be selected.

To add a segment, click at any point on the bar and click ‘Start Segment’. Click at another point and click ‘End Segment’. This new feature can be used with both audio and video files and works for all output formats (WebM, Opus, MKV, etc).

Batch Auto-Crop

The batch cropping window has a new option to select multiple videos and auto-crop or reset the cropping parameters. This is useful if you want to remove black borders from multiple videos but don’t have the patience to crop them one by one. Simply select all items in the list and click the ‘AutoCrop’ button.

MPV Support

The MPlayer builds in Ubuntu repositories seems to be outdated. The mplayer version that I have on my system doesn’t play H265 videos. Also I couldn’t find a PPA which has new builds of MPlayer.

I have added support for using MPV video player as the back-end for playing audio and video inside Selene. You can select this option from the settings window.

Installation

Ubuntu-based Distributions (Ubuntu, Linux Mint, etc)

Packages are available in the Launchpad PPA for supported Ubuntu releases. Run the following commands in a terminal window:

sudo apt-add-repository -y ppa:teejee2008/ppa
sudo apt-get update
sudo apt-get install selene

For older Ubuntu releases which have reached end-of-life, you can install Aptik from the DEB files linked below.
selene-latest-i386.deb (32-bit)
selene-latest-amd64.deb (64-bit)

Debian

DEB files are available from following links:
selene-latest-i386.deb (32-bit)
selene-latest-amd64.deb (64-bit)

Other Linux Distributions

An installer is available from following links:
selene-latest-i386.run (32-bit)
selene-latest-amd64.run (64-bit)

Removal

Run the following commands in a terminal window:

sudo apt-get purge selene

Donations

If you want to buy me a coffee or send some donations my way, you can use Google wallet or Paypal to send a donation to teejeetech at gmail dot com.

Donate with Paypal

Donate with Google Wallet

Coming Soon: A New Archive Manager for Ubuntu

$
0
0
New Archive Manager.md

These are screenshots of a new archive manager that I’m working on. Should be ready by end of March.


Compression Options Dialog - I was missing the options that are available in the 7zip utility on Windows, so I decided to create something similar. None of the current Linux archivers like File Roller, Ark, etc provide access to all the 7zip settings. Peazip provides all the options but I don’t like Peazip’s UI which displays the options in multiple tabs. This dialog displays all available options in the same window using a compact layout.

Compression Progress Window - The progress dialog displays detailed stats on the compression progress. It also displays the live compression ratio (the darker blue bar). This is similar to the progressbar that WinRAR used to display on Windows.

I need a name for this archive manager. Any suggestions?

Conky Manager v2 Overview

$
0
0

Conky Manager v2 is now available. This is a major update with a completely revamped UI and options.

A big thanks to all who donated to the project. People who donated will receive a complementary user manual via email.

The major changes are summarized below:

New UI with Previews

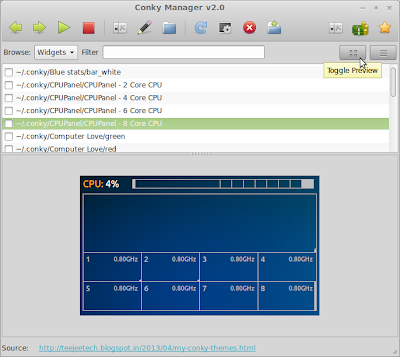
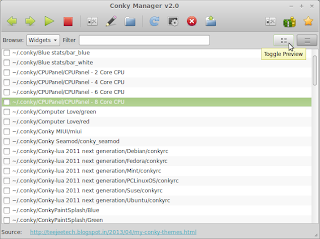
The main window now displays a list and a preview area.

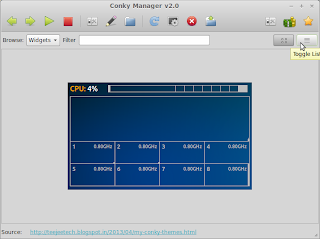
The list and preview areas can be resized, or hidden using the toggle buttons on the right.

Widgets and Themes

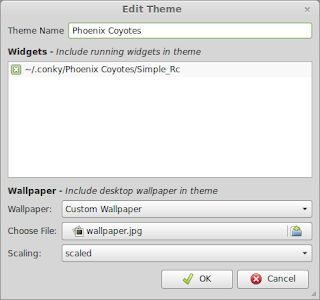
  • A Widget is a Conky configuration file (conkyrc file). A theme is a combination of widgets along with a wallpaper (cmtheme file). Widgets and Themes can be browsed by selecting the dropdown at the top left.

  • Selecting 'Widgets' from the dropdown will list all conkyrc files in the directory ~/.conky. This directory is now the default location where CM will keep all files. This location cannot be changed.

  • You can specify additional search locations from the settings window. By default CM will search and add all locations where conkyrc files can be found (like ~/.Conky, ~/.config/conky, etc).

Browsing Widgets and Themes

  • Use the arrow keys on your keyboard to browse the themes. You can also use the Previous and Next buttons on the toolbar.

  • Press the Enter key on your keyboard to Start and Stop widgets, or use the toolbar buttons.

  • Enter a name in the Filter textbox to filter the list. Enter '0' to display all widgets which are currently active (running).

Editing Widgets and Themes

  • Select a widget or theme from the list and click the Edit button on the toolbar.

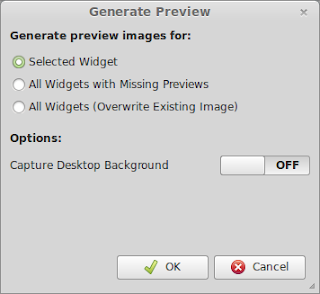
Generate Previews

  • If the preview image is missing for any widget, you can generate it using the toolbar button.

  • Generating previews will take some time. The images are saved in the same directory that has the conkyrc file.

  • Previews can be generated only for widgets (not themes).

User Manual

If you wish to receive a copy of the user manual please leave a donation using the PayPal link below. The copy will be sent to you by email.

The manual has a detailed description of the functionality along with steps required for creating theme packs and for fixing common issues.

People who have already donated to this project or who have contributed in some other way (translations, etc) need not donate again. Just drop me a mail to receive your copy.

Options

Selene v16.3.1

$
0
0
Selene v16.3.1.md

Selene v16.3.1

What’s New

Multiple Audio and Subtitle Track Support

Selene can now encode files with multiple audio and subtitle tracks. Previously, only the first video/audio/subtitle track in the input file would be encoded and the remaining tracks would be discarded. Starting with this version, all tracks will be encoded by default, for file formats that support multiple tracks (MKV, MP4 and OGG/OGV).

After adding a file to the main list, the item can be expanded to see the tracks inside the file. Click on the arrow to expand the item.

Un-select the tracks that you don’t wish to encode to the output file.

The default track will be set from the language selected in the settings dialog.

If the input file has an audio/subtitle track in the default language then that track will be set as the default track. Otherwise, the first audio/subtitle track will be set as default.

Note: Most modern video players select the correct audio/subtitle track automatically based on the user’s system language/locale settings. Setting the default track is useful for older video players.

OGG Theora and OGG Subtitles

The ffmpeg2theora tool has been removed as a dependency. Theora video will now be encoded using ffmpeg/avconv. Subtitles and lyrics in OGG files are now fully supported and will encoded using the Kate encoding tool (kateenc).

H265/HEVC Video in MKV

H265/HEVC video can now be selected while encoding to MKV file format. This option was not available in previous versions as the MKVMerge tool did not support HEVC tracks properly. Make sure you have the latest “mkvtoolnix” package installed if you use this option (v7.3.0 or higher) .

Bug Fixes

  • There was an issue on non-English systems (such as German) which use comma as a decimal separator. The decimal values in presets were saved and loaded incorrectly. This has been fixed.

  • The encoding mode was not set correctly for the vorbis encoder. This has been fixed.

Installation

Ubuntu-based Distributions (Ubuntu, Linux Mint, etc)

Packages are available in the Launchpad PPA for supported Ubuntu releases. Run the following commands in a terminal window:

sudo apt-add-repository -y ppa:teejee2008/ppa
sudo apt-get update
sudo apt-get install selene

For older Ubuntu releases which have reached end-of-life, you can install Aptik from the DEB files linked below.
selene-latest-i386.deb (32-bit)
selene-latest-amd64.deb (64-bit)

Debian

DEB files are available from following links:
selene-latest-i386.deb (32-bit)
selene-latest-amd64.deb (64-bit)

Other Linux Distributions

An installer is available from following links:
selene-latest-i386.run (32-bit)
selene-latest-amd64.run (64-bit)

Removal

Run the following commands in a terminal window:

sudo apt-get purge selene

Donations

If you want to buy me a coffee or send some donations my way, you can use Google wallet or Paypal to send a donation to teejeetech at gmail dot com.

Donate with Paypal

Donate with Google Wallet

Aptik v16.4.1

$
0
0
Aptik v16.4.1.md

This is major update with many new features. Existing users are advised to upgrade.

What’s New

Backup & Restore /etc/fstab and /etc/crypttab entries

Aptik can now backup and restore entries in /etc/fstab and /etc/crypttab.

During backup, the fstab and crypttab files are saved to the backup location, along with any key files referenced by crypttab. Files are encrypted with GPG so that the passwords and key files referenced by crypttab remain safe.

During restore, missing entries will be appended to the fstab and crypttab files and the mount point directories will be set up with proper permissions. Key files (if any) will be restored to the original location.

Backup & Restore Users and Groups

Aptik can now backup and restore any custom users and groups that you may have created on your system.

During restore, the missing users and groups will be created and the group memberships will be updated for the newly created users.

Note - All user account settings will also be restored including the login password, group memberships, account expiry settings, password change policy, etc.

Note - Aptik will only backup/restore users and groups that were created by the user. System accounts and groups will not be modified since they are created by applications.

Backup & Restore User Data in Home

Aptik can now backup and restore the user data in home directory. Duplicity is used as the back-end. This is the same back-end that is used by tools like Deja-dup. Duplicity is extremely fast and can take incremental backups to save time. Backups are compressed with GZip, and encrypted with GPG.

Note - Symbolic links in the home directory will be saved as symbolic links in the backup and will be re-created correctly after restore.

Note - This section will backup and restore only the user data in home directory. Data created by applications (such as the data in hidden app config directories) are not backed up. Use the Application Settings section for managing the data created by applications.

One-Click Backup & Restore

There is now an option to backup and restore all items with a single click. This saves the effort of clicking the backup and restore buttons for each section.

Note - The default behaviour is to backup and restore everything so that you get exactly the same system after restoring. There is usually no need to click the individual backup and restore buttons for each section. It is recommended to use the one-click button for backup and restore instead of using the backup and restore options for individual sections.

Future Changes

In my opinion, the options provided by Aptik now cover 90% of the manual set-up that users do on their new systems. The remaining 10% are things that are better done manually than by using an automated tool. If there is any other item for backup/restore which you want added to Aptik, let me know by email or in the comments below and I’ll see if it can be added.

Feel free to send me an email if you notice any issues or if you have any suggestions. You can use the links below to buy me a cup of coffee if Aptik has saved your time.

Donate with Paypal
Donate with Google Wallet

Installation

Ubuntu-based Distributions (Ubuntu, Linux Mint, etc)

Packages are available in the Launchpad PPA for current Ubuntu releases. Run the following commands in a terminal window:

sudo apt-add-repository -y ppa:teejee2008/ppa
sudo apt-get update
sudo apt-get install aptik

For older Ubuntu releases which have reached end-of-life, you can install Aptik from the DEB files linked below.
aptik-latest-i386.deb (32-bit)
aptik-latest-amd64.deb (64-bit)

Debian

DEB files are available from following links:
aptik-latest-i386.deb (32-bit)
aptik-latest-amd64.deb (64-bit)

Other Linux Distributions

Aptik depends on Debian package managers like apt-get and aptitude. It should not be used on non-Ubuntu distributions.

Removal

Run the following commands in a terminal window:

sudo apt-get purge aptik

Donations

If you want to buy me a cup of coffee or send some donations my way, you can use Google wallet or Paypal to send a donation to teejeetech at gmail dot com.

Donate with Paypal
Donate with Google Wallet

Donations received from Jan to April

$
0
0
The following donations were received from Jan to April 2016. Thanks to everyone who donated. This list will be updated once a month on the Donations page.

DateDonorAmountProject
17-Apr-16Gabor Varnai$10Selene
09-Mar-16ertugrulharman.com$3Timeshift
08-Mar-16Gregg Yearwood$10ConkyManager
27-Feb-16Marco Rossi$10Selene
16-Feb-16Art Doyle$10Timeshift
13-Feb-16Speechcenter, Inc.$20
12-Feb-16Warren Hall$10ConkyManager
10-Feb-16Raymond Shaffer$10ConkyManager
09-Feb-16Jon Loveless$10ConkyManager
25-Jan-16Don Lupo$10ConkyManager
05-Jan-16Gunter Beckmann$10Timeshift
03-Jan-16Alan Whitehead$10ConkyManager

Donate

If you want to buy me a coffee or send some donations my way, you can use Google wallet or Paypal to send a donation to teejeetech at gmail dot com.

Donate with Paypal

Donate with Google Wallet


Ubuntu Kernel Upgrade Utility

$
0
0
Ukuu.md

Introducing Ubuntu Kernel Upgrade Utility

This is a tool for installing the latest mainline Linux kernel on Ubuntu-based distributions.

Features:

  • Fetches list of kernels from kernel.ubuntu.com
  • Displays notifications when a new kernel update is available.
  • Downloads and installs packages automatically

Installation

Ubuntu-based Distributions (Ubuntu, Linux Mint, etc)

Packages are available in the Launchpad PPA for supported Ubuntu releases. Run the following commands in a terminal window:

sudo apt-add-repository -y ppa:teejee2008/ppa
sudo apt-get update
sudo apt-get install ukuu

For older Ubuntu releases which have reached end-of-life, you can install Aptik from the DEB files linked below.
ukuu-latest-i386.deb (32-bit)
ukuu-latest-amd64.deb (64-bit)

Debian

DEB files are available from following links:
ukuu-latest-i386.deb (32-bit)
ukuu-latest-amd64.deb (64-bit)

Other Linux Distributions

An installer is available from following links:
ukuu-latest-i386.run (32-bit)
ukuu-latest-amd64.run (64-bit)

Removal

Run the following commands in a terminal window:

sudo apt-get purge ukuu

Donations

If you want to buy me a coffee or send some donations my way, you can use Google wallet or Paypal to send a donation to teejeetech at gmail dot com.

Donate with Paypal
Donate with Google Wallet

Upgrade to Ubuntu 16.04 with Aptik

$
0
0
Ubuntu-16.04-upgrade-with-aptik.md

Upgrade to Ubuntu 16.04 with Aptik

Ubuntu 16.04 was just released a few hours ago. Here’s the easy way to upgrade to Xenial using the Aptik Migration Utility.

1. Install Aptik on your current system

Open a terminal window and run the following commands to install Aptik.

sudo apt-add-repository -y ppa:teejee2008/ppa ; \
sudo apt-get update ; \
sudo apt-get install aptik

Note: Copy-paste the entire text given above. Don’t copy line by line.

2. Backup your current system

  1. Plug-in a portable hard-disk or a USB thumb drive with enough free space (8GB or more is recommended).

  2. Start Aptik from the Application Menu and select a folder on the portable disk as the backup location.

https://1.bp.blogspot.com/-USQkqQAYyUU/Vxj_ymwBnbI/AAAAAAAADX8/UHsrw9b2PA4oXRAlB6aMywVDp4z7siXNQCLcB/s1600/Aptik%2BMigration%2BUtility%2Bv16.4.2_005.png

  1. Click on the “One-Click Backup” button and let it finish. This will create a backup of pretty much everything on your current system.

3. Install Ubuntu 16.04

Download Ubuntu 16.04 from the official website and do a fresh installation.

4. Restore Backups

  1. Install Aptik again on the new system using the command given in Step 1.

  2. Plug-in the hard disk that was used earlier and select the backup folder in Aptik.

  3. Click on the “One-Click Restore” button and let it finish. This may take a while as all the softwares that you had on your previous system will be re-installed.

Tips:

Reset Desktop Layout

Restoring the Application Settings will also restore your desktop layout from the previous system. In case you want a fresh desktop, you need to run the following commands, log-out and then log-in again.

Note: Copy-paste the entire text given below in a terminal window. Don’t copy line by line.

Cinnamon:

rm -rf $HOME/.cinnamon ; \
rm -rf $HOME/.config/cinnamon-session ; \
rm -rf $HOME/.local/share/cinnamon ; \
dconf reset -f /org/cinnamon/

Unity:

dconf reset -f /org/compiz/

Xfce (source):

xfce4-panel --quit ; \
pkill xfconfd ; \
rm -rf $HOME/.config/xfce4/panel ; \
rm -rf $HOME/.config/xfce4/xfconf/xfce-perchannel-xml/xfce4-panel.xml ; \
xfce4-panel

MATE:

rm -rf $HOME/.config/mate ; \
mate-panel --reset

Note: You need to log out and log-in again for the changes to take effect.

Free Up Disk Space by Clearing APT Cache

Run the following command to delete downloaded packages in the cache located at /var/cache/apt/archives. This should free up nearly 1-2 GB on your system.

sudo apt-get autoclean

In case you plan to re-install some software in the future and wish to keep the downloaded packages, run the following command instead:

sudo apt-get clean

This will delete older package versions from the cache (new versions will be kept).

Install the Latest Linux Kernel

Xenial comes with Linux v4.4.6 which is already one month old. You can upgrade to the latest mainline kernel (v5.1 as of now) using the Ubuntu Kernel Update Utility.

Ubuntu Kernel Update Utility (Ukuu) v16.7

$
0
0
Ukuu v16.7 is now available. This is a major update which fixes all issues reported with the previous version.


 What's New 
  • Ukuu can now start in non-admin mode. It will prompt for the admin password before installing or removing a kernel.
  • Ubuntu's official kernels will also be listed. It will show all installed Ubuntu kernels with an option to remove them.
  • The notification functionality has been fixed. It will now display a notification dialog with an option to install the new update. The notification interval can also be selected as hourly, daily, weekly, etc.
  • Icons have been added to indicate the kernel type. 

Installation

Ubuntu-based Distributions (Ubuntu, Linux Mint, etc)

Packages are available in the Launchpad PPA for supported Ubuntu releases. Run the following commands in a terminal window:

sudo apt-add-repository -y ppa:teejee2008/ppa
sudo apt-get update
sudo apt-get install ukuu

For older Ubuntu releases which have reached end-of-life, you can install Ukuu from the DEB files linked below.
ukuu-latest-i386.deb (32-bit)
ukuu-latest-amd64.deb (64-bit)

Removal

Run the following commands in a terminal window:

sudo apt-get purge ukuu

Donations

If you want to buy me a coffee or send some donations my way, you can use Google wallet or Paypal to send a donation to teejeetech at gmail dot com.
Donate with Paypal
Donate with Google Wallet

Timeshift Preview

$
0
0
Timeshift Reloaded.md

I’m working on some changes for Timeshift. The UI has been re-designed to make it easier to use. The update is currently under testing and will be available by first week of October.

What’s New

Better status display

The status bar has been redesigned to display the status in a better way. It will warn you if the disk is full, if the disk is offline or if scheduled snapshots are disabled. It also displays the number of snapshots and remaining free space.

Better snapshot creation

Snapshots are now created using rsync’s --link-dest option. This is much faster and creates snapshots in a single step. Snapshot creation can be cancelled safely while it is in progress.

Creating snapshots will display detailed progress information such as the list of files being copied and estimated time remaining. Detailed statistics are displayed for the number of files which were created, deleted or modified since the last snapshot.

Better snapshot deletion

Deleting snapshots was a time consuming task in the previous version of Timeshift. Since each snapshot typically contains more than 150,000 files (for a freshly installed Ubuntu system), deleting these files can take some time to complete. Starting with v16.9, snapshots can be now be “marked” for deletion by right-clicking on them from the main window and selecting “Mark for deletion”. Marked snapshots will be deleted silently in the background during the scheduled run.

Deleting a snapshot will display detailed progress information such as the name of file being deleted and the estimated time remaining. The progress window can be closed while files are being deleted and the deletion will continue in the background.

Better performance

All disk operations such as creation and deletion of snapshots are now executed with a higher IONice value. This gives a greater priority to other applications running on the system and eliminates any lag or reduction in system performance when the disk operations are running. Overall, your system will feel smoother and more responsive while the snapshots are being created or deleted.

Better free space management

Snapshots will be created only if the snapshot device has more than 1 GB of free space. Scheduled snapshots will be disabled if there is not enough space.

Better settings

There’s a new setup wizard to guide users on the first run of the application. It selects the best options by default and guides the user through the basic setup. This is in addition to the settings window which has been re-designed with a simpler layout.

Better snapshot logs

There’s a new log viewer which displays the list of files that were created, deleted or modified since the last snapshot. The list of files can be filtered to analyze system changes. For example, you can filter the list to view all files that were created on the system since the last snapshot. This is useful for monitoring system changes.

Timeshift v16.10

$
0
0
Timeshift v16.10

Timeshift v16.10 is now available. Existing users are encouraged to upgrade. Changes are summarised in the previous post.

Supported Distributions

  • Ubuntu and derivatives (Xubuntu, Kubuntu, Linux Mint, Elementary OS, etc)
    • Use the PPA or DEB file to install.
  • Fedora and derivatives (CentOS, RHEL, etc)
    • Use the .run installer to install
  • Arch Linux and derivatives (Manjaro, Apricity, Antergos, etc)
    • Use the .run installer to install

Supported Systems

  • Normal - OS installed on non-encrypted partitions (with or without encrypted home directory).
  • LUKS - OS installed on LUKS encrypted partitions
  • LVM2 - OS installed on LVM2 volumes (with or without LUKS)
  • BTRFS - OS installed on BTRFS volumes (with or without LUKS). Subvolume layout must be Ubuntu-type with @ and @home subvolumes. Other layouts are not supported.
  • GRUB2 - Bootloader must be GRUB2. GRUB legacy and other bootloaders are not supported.
  • EFI - EFI systems are fully supported. Please make sure that /boot/efi partition is selected while restoring (it will do it automatically).
  • Docker & containers - Docker and containerized systems are not supported. Running Timeshift on such systems will have unpredictable results.

Send me an email if you face issues after restore or if you have a system setup that is not in the list above.

Installation

Ubuntu and derivatives (Ubuntu, Linux Mint, etc)

Packages are available in the Launchpad PPA for supported Ubuntu releases. Run the following commands in a terminal window:

sudo apt-add-repository -y ppa:teejee2008/ppa
sudo apt-get update
sudo apt-get install selene

For older Ubuntu releases which have reached end-of-life, you can install from the DEB files linked below.
timeshift-latest-i386.deb (32-bit)
timeshift-latest-amd64.deb (64-bit)

Debian

DEB files are available from following links:
timeshift-latest-i386.deb (32-bit)
timeshift-latest-amd64.deb (64-bit)

Other Linux Distributions

An installer is available from following links:
timeshift-latest-i386.run (32-bit)
timeshift-latest-amd64.run (64-bit)

Removal

Run the following commands in a terminal window:

sudo apt-get purge timeshift

Donations

If you want to buy me a coffee or send some donations my way, you can use Google wallet or Paypal to send a donation to teejeetech at gmail dot com.

Donate with Paypal

Donate with Google Wallet

Viewing all 136 articles
Browse latest View live