Aptik is a new tool to simplify re-installation of packages after doing a clean installation of an Ubuntu-based distribution. It can be used while re-installing or upgrading to the next Ubuntu/Linux Mint release.
![]()
Upgrading to the next release of an Ubuntu-based distribution can be a painful task.
While most Ubuntu-based distributions provide an option to upgrade your existing installation, it can cause a number of problems.
- It sometimes results in broken packages.
- If proprietary graphic drivers are in use, the system may boot into a black screen after the upgrade.
- The look and feel of the new release is lost since the previous desktop settings are used.
In order to avoid problems most people prefer to do a clean installation. They download the ISO image, format the system partition, and then install the new release.
You get a good feeling when you boot into your shiny new system. Then you realise that you need to re-install all your softwares again and your excitement goes down. Aptik is a new tool that will make your life easier. While it won't eliminate all the work that needs to be done after a fresh installation, it will reduce it greatly.
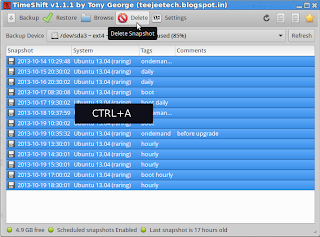
Take Backups on the Old System
1) Install Aptik
Install Aptik with the following commands:
sudo apt-add-repository -y ppa:teejee2008/ppa
sudo apt-get update
sudo apt-get install aptik
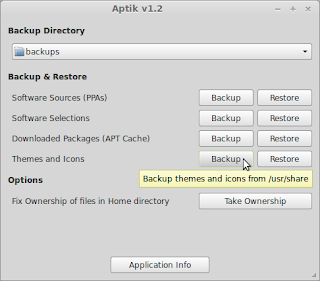
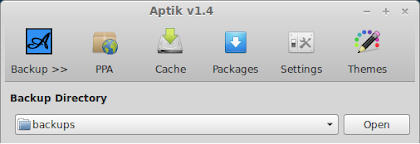
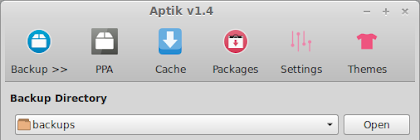
2) Create a Backup Folder
Plug-in your pen drive and create a new folder on it named 'backups'.
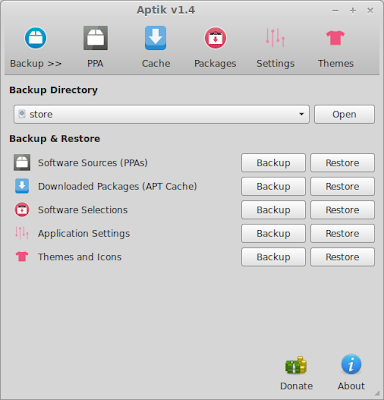
Start Aptik from the applications menu.
Select the new folder as the backup directory.
![]()
![]()
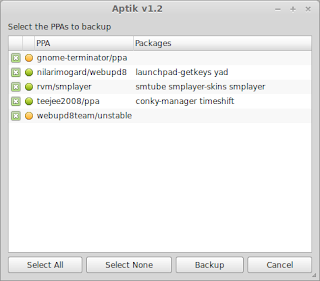
3) Backup Software Sources
Click the Backup button for Software Sources. A list of third-party PPAs will be displayed along with names of packages that are installed from the PPA.
![]()
![]()
PPAs with a green icon are active and have some packages installed.
PPAs with a yellow icon are active but unused (no packages installed).
Select the PPAs to backup and click the Backup button.
A file named 'ppa.list' will be created in the backup directory.
4) Backup Software Selections
Click the Backup button for Software Selections. A list of installed top-level packages will be displayed.
![]()
![]()
These packages are top-level packages. Dependency packages will not be listed.
All packages that are a part of the Linux distribution are un-selected by default. For example, Firefox is a package that is installed by default on most Linux distributions. Since it came with the distribution, it will be un-selected by default. It can be selected if required.
All extra packages that were installed by the user are selected by default. For example, if you had installed the package for Chrome web browser (using the Software Center or by running apt-get install command) the package will be selected by default. It can be un-selected if required.
Select the packages to backup and click the Backup button.
A file named 'packages.list' will be created in the backup directory.
5) Backup Downloaded Packages
Click the Backup button for Downloaded Packages.
![]()
The packages in your system cache (/var/cache/apt/archives) will be copied to the backup folder.
This step is useful only if the system is being re-installed. When the system is upgraded this step can be skipped since the packages for the new Ubuntu release will be newer than the packages in the system cache.
Restoring the downloaded packages on the new system will save time and internet bandwidth when the packages are re-installed. Since the packages will be available in the system cache, the download will be skipped and installation will complete more quickly.
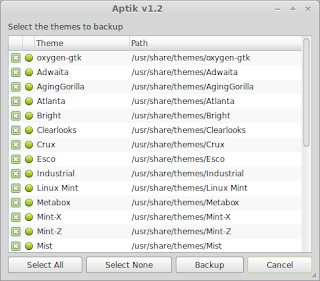
6) Backup Themes and Icons
Click the Backup button for Themes and Icons. A list of installed themes will be displayed.
![]()
![]()
These themes are from the directories /usr/share/themes and /usr/share/icons.
Select the themes to backup and click the Backup button.
Selected themes will be zipped and saved in the backup folder.
Restore Backups after Installing the New System
After installing the new Linux distribution the backups can be restored.
1) Install Aptik
Install Aptik with the following commands:
sudo apt-add-repository -y ppa:teejee2008/ppa
sudo apt-get update
sudo apt-get install aptik
2) Select the Backup Folder
Plug-in your pen drive.
Start Aptik from the applications menu.
Select the backup folder on the pen-drive as the backup directory.
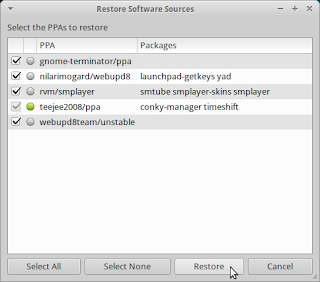
3) Restore Software Sources
Click the Restore button for Software Sources. PPAs from the backup file 'ppa.list' will be displayed.
![]()
![]()
PPAs with a green icon are already active.
PPAs with a gray icon are not active and can be added.
Select the PPAs to restore and click the Restore button.
Selected PPAs will be added to the system.
4) Restore Software Selections
Click the Restore button for Software Selections. Packages from the backup file 'packages.list' will be displayed.
![]()
![]()
Packages with a green icon are already installed.
Packages with a gray icon are not installed and can be selected for installation.
Packages with a red icon are not available in software repositories and cannot be installed.
Select the packages to restore and click the Restore button.
Selected packages will be installed on the system.
5) Restore Downloaded Packages
Click the Restore button for Downloaded Packages.
![]()
The packages in your backup directory will be copied to system cache (/var/cache/apt/archives).
This step is useful only if the system is being re-installed. When the system is upgraded this step can be skipped since the packages for the new Ubuntu release will be newer than the packages in the system cache.
Restoring the downloaded packages will save time and internet bandwidth when the packages are installed. Since the packages will be available in the system cache, the download will be skipped and installation will complete more quickly.
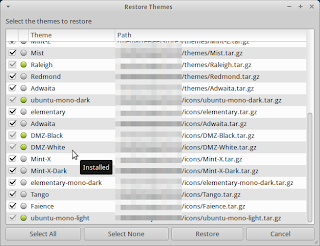
6) Restore Themes and Icons
Click the Restore button for Themes and Icons. A list of themes available in the backup directory will be displayed.
![]()
![]()
Themes with a green icon are already installed.
Themes with a gray icon are not installed and can be selected for installation.
Select the themes to restore and click the Restore button.
Selected themes will be extracted to system directories /usr/share/themes and /usr/share/icons.
More Options
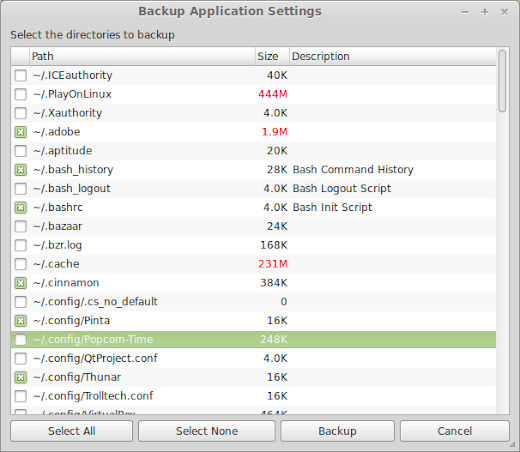
Fix Ownership of Home folder
The home folder can be manually copied to another location and then restored after doing a fresh install. However, it can sometimes cause problems if the user's login name or UID is different from the previous one. Click the Take Ownership button to change ownership of files in your home directory to your current login ID. This is same as running the following command
sudo chown username -R /home/username
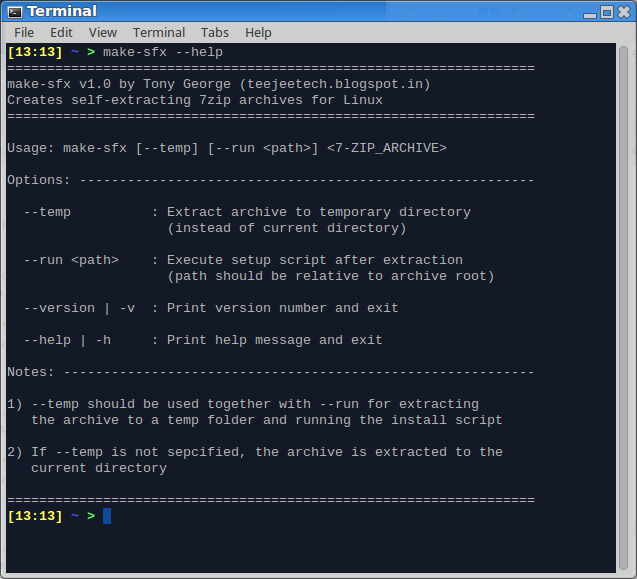
Command-line Options
Run aptik --help to see the full list of options.
![]()
Disclaimer
This program is free for personal and commercial use and comes with absolutely no warranty. The author will not be liable for any damages arising from the use of this program.
This program is distributed in the hope that it will be useful, but WITHOUT ANY WARRANTY; without even the implied warranty of MERCHANTABILITY or FITNESS FOR A PARTICULAR PURPOSE.
See the GNU General Public License for more details.
Support This Project
This software is free for personal and commercial use and is licensed under the GNU General Public License. If you need help for any issues or wish to support its development, please purchase a support subscription using the PayPal link below.