Quantcast
Channel: TeeJeeTech
Viewing all 136 articles
Browse latest View live

Vala #1: Introduction

$
0
0

Ever heard of the Vala programming language?


Its an new object-oriented programming language that has recently become very popular. It is based on C with a syntax similar to C#. It provides many high-level language contructs which are missing in a low-level language like C. It provides properties, generics, memory management, foreach loops, and a host of other features that, till now, was available only to C# developers.

So whats the big deal you ask?


There is no lack of programming languages these days. A new language gets invented every other day and it becomes impossible for any developer to keep track of them all. At the surface Vala looks like just another programming language, one that models the syntax of an existing language (C#) while trying to provide features missing in another (C).

What's different about Vala is how it compiles the source code.


When it comes to compilation, Vala does something wonderfully different. The Vala source code is first translated to the equivalent C code, and then the resulting C code is compiled to an executable file using the standard C compiler.

The net result? - A native executable file that doesn't depend on anything other that the C runtime. It doesn't depend on any framework or interpreter. The code can be compiled and run on any system which has a C compiler to produce a native executable. It nearly as fast as a program written in pure C code and many times faster than a program which is interpreted or executed by a runtime (C#, etc).

Whether you are someone who works with C/C++ code or someone who works with C# and .NET languages, Vala is something you need to take a look at.

Hit the link below for an excellent tutorial:
Vala Tutorial at GNOME Live

Vala #2: Creating Simple Applications

$
0
0
I'll assume that you have gone through the official tutorial and that you have worked with C,C++ or C# languages before. The code samples are pretty self-explanatory. I'll be providing comments for only those code segments that are not so obvious. First lets install the vala compiler by typing the following in a terminal window:
apt-get install valac libgtk-3-dev 
I'm assuming that you are using an Ubuntu/Debian system. If you are using something else then you'll need to do a quick search on the web for installing the vala compiler for your system.

Simple 'Hello World' program


Here's what a 'Hello World' program looks like in Vala.
int main() {
print("Hello World\n");
return 0;
}
Save this in a file named hello.vala and compile it with the command:
valac "hello.vala" -o hello
This will create an executable file named 'hello' in the current directory. Execute the file from a terminal:
./hello


Simple 'hello world' program using objects


Here's the same example written again using Vala's object-oriented features. The program will simply display the first argument that is passed to it.

class Example : GLib.Object {

public static void main(string[] args) {
var ex = new Example();
if (args.length < 2)
print("Hello World\n");
else
ex.display(args[1]);
}

void display(string message) {
stdout.printf(message + "\n");
}
}
Save this in a file named hello2.vala and compile it with the command:
valac "hello2.vala" -o hello2
Execute the program from a terminal:
./hello2 "Welcome to Vala"


Simple GUI application using GTK


Now that we are done with the customary "Hello World" examples, let's try creating something actually useful. We will create a GUI program for deleting the "Recent Documents" history on an Ubuntu/Debian PC.

using Gtk;

class MainWindow : Window {

public static int main (string[] args)
{
Gtk.init(ref args); //Gtk intialization

var window = new MainWindow (); //Create a window
window.destroy.connect (Gtk.main_quit); //Quit app after window is closed
window.show_all (); //Makes all widgets visible

Gtk.main(); //Start the main loop

return 0;
}

public MainWindow()
{
this.title = "My First App";
this.border_width = 10;
this.set_default_size (250, 60);
this.window_position = WindowPosition.CENTER;
this.destroy.connect(Gtk.main_quit); //Quit app when window is closed

var btnClear = new Button.with_label ("Clear Recent Documents");
btnClear.clicked.connect (clear_history); //Connect event with function
add(btnClear); //Add button to window
}

public void clear_history ()
{
string HOME = Environment.get_home_dir ();

try {
Process.spawn_command_line_sync (@"rm $HOME/.local/share/recently-used.xbel");
Process.spawn_command_line_sync (@"touch $HOME/.local/share/recently-used.xbel");
messagebox_show ("Success", "Your recent documents history has been cleared");
}
catch (Error e){
string msg = e.message;
stderr.printf(msg);
messagebox_show ("Error", msg);
}
}

public void messagebox_show(string title, string message)
{
var dialog = new Gtk.MessageDialog(
null,
Gtk.DialogFlags.MODAL,
Gtk.MessageType.INFO,
Gtk.ButtonsType.OK,
message);

dialog.set_title(title);
dialog.run();
dialog.destroy();
}
}
We have written code for creating a simple window with a single button. The button's click event is connected to the function clear_history(). The clear_history() function executes commands for deleting a file in your home folder. This file contains the list of documents that were recently accessed by you.

Save this in a file named app1.vala and compile it with the command:
 valac --pkg gtk+-3.0 "app1.vala" -o app1 
The GTK3 library contains a collection of classes for creating widgets like windows and buttons. Since we are creating a GTK app, we need to link the executable with the GTK3 library (this is similar to adding a reference to a DLL file in C# project).

The '--pkg gtk+-3.0' argument tells the Vala compiler to do the linking. We can add multiple '--pkg' arguments for every library used by our application. You can refer to the Official ValaDoc Website for the full list of libraries that you can use in your projects.

I will recommend that you keep this webpage open in a web browser window when you are programming with Vala. It will let you quickly search for libraries and functions that you can use in your project. It contains the complete reference for everything you need to know about using the in-built classes and functions.

Execute the application from a terminal window:
./app1


Clicking the button will clear your 'Recent Documents' history.


Since this is a GUI program, we can also execute it by double-clicking the file from Nautilus or any other file manager. Executing it from a terminal window is better since you will be able to see the messages that the program writes to Standard Output (stdout) and Standard Error (stderr).

Hit the links below for some more GTK examples:
GTK Samples
More Code Samples

Vala #3: Setting up an IDE

$
0
0

Compiling and running programs by typing commands in a terminal window can be a tedious task - especially when you have to do it every 5 minutes. This is where an IDE comes into the picture. Using an IDE makes the task of compiling and executing a program as simple as clicking a button.

There are quite a few IDEs which can be used for Vala programming. Plugins are available for MonoDevelop, NetBeans and Eclipse IDEs which provide syntax highlighting and code-completion. However, these plugins are not without issues. Code completion sometimes stops working for no apparent reason (MonoDevelop 2.8 with monodevelop-vala plugin) and some of the other plugins can be difficult to set up.

Till recently I was using the MonoDevelop 2.8 IDE together with the monodevelop-vala plugin. Now MonoDevelop has moved to v3.0 and the plugin for v2.8 no longer works with v3.0. If you are planning to use MonoDevelop IDE then stick to version 2.8. The monodevelop-vala plugin is available in the Ubuntu repositories.

aptitude install monodevelop monodevelop-vala

I'm currently using Geany for Vala programming. Geany is a light-weight IDE that supports Vala and a host of other programming langages. It is by far the most flexible IDE that I have ever come across. You can set it up to compile code for almost any programming language. You can even write custom commands for the 'Compile' and 'Build' buttons in the IDE toolbar.

Now lets see how we can setup Geany for compiling and executing the GTK example that was presented previously. First lets install it by typing the folowing in a terminal window:

apt-get install geany libgtk-3-dev libgee-dev

I'm assuming that you're using a Ubuntu/Debian system. In case you're not, you can find the download on the Vala Tools page.

Start Geany and create a new project by clicking on Projects Menu ->New

Enter the Project Name and Base Path.

Geany will automatically create a project folder and a .geany file in the base path. The project folder will contain all files that you add to your project and the .geany file will contain your project settings.
Note: The .geany file is a simple text file that you can edit with a text editor. Take a look at the file to see the information that geany maintains for each project.

Now add a new source file to the project using the toolbar button.

Copy and paste the code for the application that we created in the previous article.


using Gtk;

class MainWindow : Window {

public static int main (string[] args)
{
Gtk.init(ref args); //Gtk intialization

var window = new MainWindow (); //Create a window
window.destroy.connect (Gtk.main_quit); //Quit app after window is closed
window.show_all (); //Makes all widgets visible

Gtk.main(); //Start the main loop

return 0;
}

public MainWindow()
{
this.title = "My First App";
this.border_width = 10;
this.set_default_size (250, 60);
this.window_position = WindowPosition.CENTER;
this.destroy.connect(Gtk.main_quit); //Quit app when window is closed

var btnClear = new Button.with_label ("Clear Recent Documents");
btnClear.clicked.connect (clear_history); //Connect event with function
add(btnClear); //Add button to window
}

public void clear_history ()
{
string HOME = Environment.get_home_dir ();

try {
Process.spawn_command_line_sync (@"rm $HOME/.local/share/recently-used.xbel");
Process.spawn_command_line_sync (@"touch $HOME/.local/share/recently-used.xbel");
messagebox_show ("Success", "Your recent documents history has been cleared");
}
catch (Error e){
string msg = e.message;
stderr.printf(msg);
messagebox_show ("Error", msg);
}
}

public void messagebox_show(string title, string message)
{
var dialog = new Gtk.MessageDialog(
null,
Gtk.DialogFlags.MODAL,
Gtk.MessageType.INFO,
Gtk.ButtonsType.OK,
message);

dialog.set_title(title);
dialog.run();
dialog.destroy();
}
}

Press CTRL+S and save the file as main.vala.

Before we can compile our program we need to tell Geany how the compilation has to be done. Go to the Project menu and open the Project Properties dialog.

Go to the Build tab.

As you can see, Geany has already added the commands for compiling and building our program. However we need to add a reference for the GTK library since our program uses GTK.

Change the build command from:

valac "%f"

to:

valac --pkg gtk+-3.0 "%f"

That's it! Now we can build our application using the Build button in the toolbar.
Click the Build button to compile your program.

You can see the compiler messages in the Status panel.

Click on the Run button to test your application.

Installing Conky on Linux Mint

$
0
0

Summary: This article covers installation and configuration of Conky on a Linux Mint system, installation of themes, and tweaks required for making themes work properly on Cinnamon desktop.

Conky is a light-weight system monitor that displays information on your Linux desktop. It is similar to the Rainmeter application on Windows and is included by default in many linux distributions like Knoppix, PartedMagic and Pinguy OS. Since it draws directly to an X-window, it is extremely lightweight and consumes very little system resources compared to other applications. There are a number of really beautiful themes available at DeviantArt and other sites.

Sadly Conky doesn't have a GUI interface for changing themes and other settings. Installing a theme involves editing config files. The settings for Conky are stored in a file named .conkyrc in your Home directory. Other files are stored in a directory named .conky. Some of the fonts used by the theme may be missing on your system and has to be downloaded and installed manually.

There are also some issues with the Cinnamon desktop in Linux Mint. Some themes will not be displayed unless we make certain changes in the .conkyrc file.

First let's install Conky by running the following command in a terminal window:

sudo apt-get install conky-all

After the packages are installed, start Conky with the following command:

conky

Since we have not yet installed any themes, Conky will pick up the default config file that came with the package: /etc/conky/conky.conf

Now let's install some themes.

Kill Conky by pressing CTRL+C in the same terminal window from which we ran Conky. If Conky refuses to quit, you can kill it forcefully by executing the following command in another terminal window:

killall conky

Download the Gotham themefrom the Deviantart site and unzip the files in your HOME directory. The .conkyrc file will go directly into your HOME directory and the remaining files will go into the .conky folder. The .conky folder will be hidden (since it starts with a dot .). To view the folder, open your file manager (Nemo/Nautilus), go to your HOME folder and press CTRL+H.

Open the .conkyrc file in a text editor (command: gedit ~/.conkyrc)

Find the following lines:

own_window no
own_window_type override
minimum_size 250 5

Change them to:

own_window yes
own_window_type normal
minimum_size 550 300

These changes are required for displaying the theme properly on Cinnamon desktop. You can skip this step if you are using Ubuntu.

Save the file and close the editor.

Start Conky again (command: conky)

Enjoy your new desktop!

Issues and Troubleshooting

Missing Fonts

Most the Conky themes that you will find on DeviantArt and other sites, use fonts which are rare. If the font is not installed on your system, then the theme will look strange.

Conky automatically uses the default font for drawing the text if the original font is missing. However, if the original font is smaller or larger than the default font, it will mess-up the alignment between the text and the background image.

Open the .conkyrc file and look at the lines at the bottom of the file. Here's a sample taken from the .conkyrc file in Gotham theme

TEXT
${voffset 10}${color EAEAEA}${font GE Inspira:pixelsize=120}${time %H:%M}
${font}${voffset -84}${offset 10}${color FFA300}${font GE Inspira:pixelsize=42}
${time %d} ${voffset -15}${color EAEAEA}${font GE Inspira:pixelsize=22}
${time %B} ${time %Y}${font}${voffset 24}${font GE Inspira:pixelsize=58}
${offset -148}${time %A}${font}
${voffset 1}${offset 12}${font Ubuntu:pixelsize=10}${color FFA300}HD ${offset 9}
$color${fs_free /} / ${fs_size /}${offset 30}${color FFA300}RAM ${offset 9}
$color$mem / $memmax${offset 30}${color FFA300}CPU ${offset 9}$color${cpu cpu0}%

The theme uses the GE Inspira and Ubuntu fonts. The Ubuntu font is installed by default on all Ubuntu systems but the GE Inspira font is not. You can download the font from sites like Font Catalogand install it by following the instructions given in the Ubuntu Wiki.

Conky is running but not visible on desktop

Open the .conkyrc file in a text editor (command: gedit ~/.conkyrc)

Find the following lines:

own_window no
own_window_type override

Change them to:

own_window yes
own_window_type normal

Theme not fully visible (truncated images and text)

Add the following line to the top of the .conkyrc file or edit the line if already present:

minimum_size 700 100

Adjust the width (700) and height (100) as required. You may need to restart Conky for the changes to be visible.

Moving the theme to another location on the desktop

Find and edit the following lines:

gap_x 60
gap_y 300

The gap_x value (60) is the distance from the left edge of the screen and the gap_y value (300) is the distance from the top edge.

MediaInfo Wrapper for .NET Projects

$
0
0

Latest version: v1.0.0.0 (2013-01-05)
Project Page:SourceForge.netGoogle Project Hosting
License: Open-Source (GNU General Public License v2)

About

MediaInfoNET is a .NET wrapper for the MediaInfo library.
MediaInfoNET.dll can be added to any VB or C# project and used for reading information from audio and video files.

Downloads

MediaInfoNET Binaries (835 KB)
MediaInfoNET Source (15 KB)

Usage

  • Add a reference to MediaInfoNET.dll to your project and import the MediaInfoNET namespace.

VB:

Imports MediaInfoNET

CS:

using MediaInfoNET;
  • Create an object of the MediaFile class and pass the file path as a parameter. The file properties can be read from the MediaFile object.

VB:

Dim aviFile As MediaFile = New MediaFile("C:\Sample.avi")

CS:

MediaFile aviFile = new MediaFile("C:\Sample.avi");
  • Download the latest copy of MediaInfo.dll from the MediaInfo website (32-bit DLL without installer) or use the file that is included with the MediaInfoNET download package. Place MediaInfo.dll in the application directory.

Complete Examples:

VB:

Imports MediaInfoNET

Module Module1

Sub Main()
Dim aviFile As MediaFile = New MediaFile("C:\Sample.avi")

Console.WriteLine()
Console.WriteLine("General ---------------------------------")
Console.WriteLine()
Console.WriteLine("File Name : {0}", aviFile.Name)
Console.WriteLine("Format : {0}", aviFile.General.Format)
Console.WriteLine("Duration : {0}", aviFile.General.DurationString)
Console.WriteLine("Bitrate : {0}", aviFile.General.Bitrate)

If aviFile.Audio.Count > 0 Then
Console.WriteLine()
Console.WriteLine("Audio ---------------------------------")
Console.WriteLine()
Console.WriteLine("Format : {0}", aviFile.Audio(0).Format)
Console.WriteLine("Bitrate : {0}", aviFile.Audio(0).Bitrate.ToString())
Console.WriteLine("Channels : {0}", aviFile.Audio(0).Channels.ToString())
Console.WriteLine("Sampling : {0}", aviFile.Audio(0).SamplingRate.ToString())
End If

If aviFile.Video.Count > 0 Then
Console.WriteLine()
Console.WriteLine("Video ---------------------------------")
Console.WriteLine()
Console.WriteLine("Format : {0}", aviFile.Video(0).Format)
Console.WriteLine("Bit rate : {0}", aviFile.Video(0).Bitrate.ToString())
Console.WriteLine("Frame rate : {0}", aviFile.Video(0).FrameRate.ToString())
Console.WriteLine("Frame size : {0}", aviFile.Video(0).FrameSize.ToString())
End If

Console.ReadLine()
End Sub
End Module

CS:

using System;
using System.Text;
using MediaInfoNET;

namespace SampleCS
{
class Program
{
static void Main(string[] args)
{
MediaFile aviFile = new MediaFile("C:\Sample.avi");

Console.WriteLine();
Console.WriteLine("General ---------------------------------");
Console.WriteLine();
Console.WriteLine("File Name : {0}", aviFile.Name);
Console.WriteLine("Format : {0}", aviFile.General.Format);
Console.WriteLine("Duration : {0}", aviFile.General.DurationString);
Console.WriteLine("Bitrate : {0}", aviFile.General.Bitrate);

if (aviFile.Audio.Count > 0)
{
Console.WriteLine();
Console.WriteLine("Audio ---------------------------------");
Console.WriteLine();
Console.WriteLine("Format : {0}", aviFile.Audio[0].Format);
Console.WriteLine("Bitrate : {0}", aviFile.Audio[0].Bitrate.ToString());
Console.WriteLine("Channels : {0}", aviFile.Audio[0].Channels.ToString());
Console.WriteLine("Sampling : {0}", aviFile.Audio[0].SamplingRate.ToString());
}

if (aviFile.Video.Count > 0)
{
Console.WriteLine();
Console.WriteLine("Video ---------------------------------");
Console.WriteLine();
Console.WriteLine("Format : {0}", aviFile.Video[0].Format);
Console.WriteLine("Bit rate : {0}", aviFile.Video[0].Bitrate.ToString());
Console.WriteLine("Frame rate : {0}", aviFile.Video[0].FrameRate.ToString());
Console.WriteLine("Frame size : {0}", aviFile.Video[0].FrameSize.ToString());
}

Console.ReadLine();
}
}
}

Selene Media Encoder for Ubuntu

$
0
0

Latest Version: 1.1 (2013-02-02)
Platform: Linux (Debian/Ubuntu)
Language: Vala & GTK3
ProjectPage:https://launchpad.net/selene

What is Selene?

Selene is an audio/video converter for linux that uses bash scripts for transcoding the input files. The scripts can use any command line utility for encoding the input and Selene will display the progress along with options to pause/resume/shutdown, etc.

Since the conversion process is driven by bash scripts, this makes Selene extremely flexible. Bash scripts can be written for a wide variety of transcoding tasks.

How does it work?

Simply drag audio/video files to the main window, select the encoding script from the drop-down and click 'Start' to begin. The progress window will display the progress for each file along with options to pause/resume encoding.

Running the app in admin mode (using sudo or gksu) will enable additional GUI options. The progress window will display two additional buttons; one for shutting down the system after encoding, and another for running the conversion process with a lower priority (background-mode).

Selene can also be used as a normal command-line utility. Run Selene with the '--help' argument to see the full list of options.

What kind of scripts are used for conversion?

The scripts are ordinary bash scripts. The simplest script would be:

x264 -o "${outDir}/${title}.mkv" "${inFile}"

This script converts any given input file to an MKV file using the x264 encoder.

${inFile}, ${outDir}, ${title} are variables which refer to the input file. These variables will be inserted into the script before execution. It is mandatory to use these variables instead of hard-coding the input file names. This is the only restriction.

The script can use any command line utility (like ffmpeg, x264, etc) for converting the files. The progress percentage will be calculated automatically from the console output.

If the encoding tool is a common tool (like ffmpeg or x264), selene will provide some additional features:

  • The console output displayed in the statusbar will be pretty-formatted
  • The input files can be auto-cropped by replacing the cropping parameters specified in the script

How does auto-cropping work?

For auto-cropping the input files:

  1. Select one or more files from the input list
  2. Right-click and select the AutoCrop option. This will calculate the cropping parameters for the file.
  3. Select any script that uses avconv, x264 or ffmpeg2theora for encoding. The script must use the cropping option for the encoder that is used. For example, we can use:
    x264 --vf crop:0,0,0,0 -o "${outDir}/${title}.mkv" "${inFile}"
    The cropping values specified in the script will be replaced with the calculated values before the script is executed.

After using the 'AutoCrop' option, the output can be previewed by right-clicking the file and selecting the 'Preview Output' option. The calculated values can be edited directly from the input file list. Clear the values to disable the cropping option.

Why can't I just run the bash script from a terminal window?

You can. But using Selene will give you the following additional options:

  • The scripts are easier to write since Selene automatically inserts commonly required variables into the script
  • A batch of files can be selected and encoded with the selected script
  • Pause/Resume options
  • Shutdown PC after encoding
  • Run the processes with low priority
  • Option to set the output location
  • Option to move the input files to a backup location after encoding

Future versions of Selene will provide options to monitor a group of folders for audio/video files and encode them automatically using pre-defined scripts.

Selene can also be used as a normal command-line utility. Run Selene with the '--help' argument to see the full list of options.

Where can I get it?

If you are using Ubuntu 12.10 (Quantal Quetzal) or its derivates (Kubuntu 12.10, Xubuntu 12.10, Mint 14, ..) then you can install it from the LaunchPad PPA:

Open a terminal window (CTRL+ALT+T) on your Ubuntu machine and type the following commands one by one:

sudo apt-add-repository -y ppa:teejee2008/ppa
sudo aptitude update
sudo aptitude install selene

For other Debian systems the DEB package can be download from LaunchPad.net

Vala #4: Using makefiles with Geany

$
0
0

In the last article we learnt how to set up Geany for compiling your Vala applications. Now we are going to see how we can create a makefile for building the entire project.

The valac "%f" command that we assigned to the Build button in the previous article works only on the current file that is open in the editor. This is enough if your project has a single .vala source file. However, most projects usually consist of multiple source files and we need a way to compile and link all those files to generate the final executable.

This is where the make utility comes into the picture. make is a classic Unix utility that is used for building executable files from source code. It reads instructions from a makefile which contains commands for building and installing the project.

Running the make command from the project directory will build the project using the commands in the makefile. It can also be used for installing and uninstalling the executable (and related files).

Creating a makefile

Lets create a makefile for our project. We will be using the same example that we used in the last article.

Add a new text file to the project and paste the following text:


all:
valac --pkg gtk+-3.0 *.vala -o app1

clean:
rm -rf *.o app1

install:
cp -f app1 /usr/bin

uninstall:
rm -f /usr/bin/app1

Save it with the file name makefile in the project folder.

The all section contains commands for building the project. We will simply execute the valac compiler for compiling the .vala files.

The install section contains commands for installing the application. We will use the cp command to install the executable file to the system folder /usr/bin. Files placed in this folder are available to all users and can be executed from any directory by typing the executable name in a terminal window.

The uninstall section contains commands for uninstalling the application. We will use the rm command to remove the executable file from /usr/bin.

Test the makefile from terminal

Open a terminal window (CTRL+ALT+T) and cd to the project folder.

  • Run 'make all' from the project directory to build the project

This will compile the .vala files to create the executable file app1 in your project directory.

  • Run 'sudo make install' to install the application

This will install the app1 executable on your system. Any user on your system can now run the app1 application by typing app1 in a terminal window.

  • Run 'sudo make uninstall' to uninstall the application

This will remove the app1 executable from your system.

Note: Since the install and uninstall commands copy or remove files from the system directory /usr/bin, we need to run 'make install' and 'make uninstall' using sudo

Using makefile with Geany

Change the build command from:

valac --pkg gtk+-3.0 "%f"
to:
make all

Clicking the Build button in the IDE toolbar will now build your entire project.

Vala #5: Toolbars

$
0
0

Basics

A toolbar provides a neatly arranged set of icons/buttons for executing various commands or actions. Unlike a menu which is also used for executing actions, toolbars are always visible to the user and readily accessible.

Toolbars can be used when there are multiple actions that need to be presented to the user. Instead of providing a button for each action, a toolbar can be used instead.

Creating a toolbar

Save the following code as app2.vala

using Gtk;

class MainWindow : Window {

public static int main (string[] args)
{
Gtk.init(ref args); //Gtk intialization

var window = new MainWindow (); //Create a window
window.destroy.connect (Gtk.main_quit); //Quit app after window is closed
window.show_all (); //Makes all widgets visible

Gtk.main(); //Start the main loop

return 0;
}

public MainWindow()
{
this.title = "Toolbars";
this.set_default_size (250, 60);
this.window_position = WindowPosition.CENTER;
this.destroy.connect(Gtk.main_quit); //Quit app when window is closed

// vboxMain
var vboxMain = new Box (Orientation.VERTICAL, 0);
add (vboxMain);

// Create Toolbar
var toolbar = new Gtk.Toolbar ();
toolbar.toolbar_style = ToolbarStyle.BOTH_HORIZ;
toolbar.get_style_context().add_class(Gtk.STYLE_CLASS_PRIMARY_TOOLBAR);
vboxMain.pack_start (toolbar, false, false, 0);

// Create Toolbar buttons
var btnAdd = new Gtk.ToolButton.from_stock (Gtk.Stock.ADD);
btnAdd.is_important = true;
toolbar.add (btnAdd);

var btnRemove = new Gtk.ToolButton.from_stock (Gtk.Stock.REMOVE);
toolbar.add (btnRemove);

var btnClear = new Gtk.ToolButton.from_stock (Gtk.Stock.CLEAR);
toolbar.add (btnClear);

// Create a treeview showing a list of Items
var treeview = new TreeView();
treeview.insert_column_with_attributes (-1, "Item", new CellRendererText(), "text", 0);

// Add the treeview to a scrollable window
var scrolledwin = new ScrolledWindow(treeview.get_hadjustment (), treeview.get_vadjustment ());
scrolledwin.set_shadow_type (ShadowType.ETCHED_IN);
scrolledwin.add (treeview);
scrolledwin.set_size_request (-1, 150);
vboxMain.pack_start (scrolledwin, true, true, 0);
}
}

Compile it with the command:

valac --pkg gtk+-3.0 app2.vala -o app2

Run it:

./app2

Adding a button

var btnAdd = new Gtk.ToolButton.from_stock (Gtk.Stock.ADD);
btnAdd.is_important = true;
toolbar.add (btnAdd);

We have created the toolbar button using the contructor ToolButton.from_stock(). This constructor creates a button with a standard icon and standard text. The icon is set from the system icon theme and the text is set based on the system language. The icon and text can also be set manually.

Setting the style

toolbar.toolbar_style = ToolbarStyle.BOTH_HORIZ;

ToolbarStyle.ICONS - Only icons are displayed.

ToolbarStyle.TEXT - Only labels are displayed.

ToolbarStyle.BOTH - Label will be displayed vertically below the icon for all toolbar buttons.

ToolbarStyle.BOTH_HORIZ (Recommended) - Label will be displayed horizontally to the right of the icon. Label is displayed only if the "is_important" property is TRUE for the ToolButton. This property has to be set manually for those buttons which should display the label.

Specify the important buttons

Set the is_important property to TRUE for all toolbar buttons which are important. Labels will be displayed for these items when toolbar style is BOTH_HORIZ.

Setting the background

GTK3 has an option for specifying whether a particular toolbar is the primary toolbar in a window. The primary toolbar will be highlighed with a nice background effect if the GTK theme supports the style.

toolbar.get_style_context().add_class(Gtk.STYLE_CLASS_PRIMARY_TOOLBAR);

Adwaita theme - Toolbar without background effect

Adwaita theme - Toolbar with background effect

Please note that all GTK3 themes don't support this property.

Docking the items to the right

Add a separator and set the draw and expand properties as shown below. Any items added after the separator will be docked on the right side of the toolbar.

var separator = new Gtk.SeparatorToolItem();
separator.set_draw (false);
separator.set_expand (true);
toolbar.add (separator);

var btnSettings = new Gtk.ToolButton.from_stock (Gtk.Stock.PREFERENCES);
toolbar.add (btnSettings);


Selene Media Encoder for Ubuntu v2.0

$
0
0

Latest Version: 2.0 (2013-03-31)
Platform: Linux (Debian/Ubuntu)
Language: Vala & GTK3
ProjectPage:https://launchpad.net/selene

Selene Media Encoder

Selene is an audio/video converter for converting files to OGG,OGV, MKV,MP4,WEBM,OPUS,AAC,FLAC,MP3 and WAV formats. It aims to provide a simple GUI for converting files to popular formats along with powerful command-line options for automated/unattended encoding.

Features

  • Encode videos to MKV,MP4,OGV,WEBM formats.
  • Encode music to MP3,AAC,OGG,OPUS,FLAC,WAV formats.
  • Options to pause/resume encoding
  • Options to run with lower priority and shutdown PC after encoding
  • Bash scripts can be written to control the encoding process
  • Commandline interface for unattended/automated encoding

Screenshots

Installation

If you are using Ubuntu 12.10 (Quantal Quetzal) or its derivates (Kubuntu 12.10, Xubuntu 12.10, Mint 14, ..) then you can install it from the LaunchPad PPA:

Open a terminal window (CTRL+ALT+T) on your Ubuntu machine and type the following commands one by one:

sudo apt-add-repository -y ppa:teejee2008/ppa
sudo aptitude update
sudo aptitude install selene

For other Debian systems the DEB package can be download from LaunchPad.net

AAC Encoding

For encoding to AAC/MP4 format you need to install the NeroAAC encoder. Run the following commands in a terminal window. It will download and install the NeroAAC encoder.

cd /tmp
wget http://ftp6.nero.com/tools/NeroAACCodec-1.5.1.zip
unzip -j NeroAACCodec-1.5.1.zip linux/neroAacEnc
sudo install -m 0755 neroAacEnc /usr/bin
sudo apt-get install gpac

Vala #6: Localization

$
0
0

Basics

Software applications are usually developed in a single language. So even though a programmer in Russia would be writing code using English keywords, the user interface and the messages in the application would probably be in Russian. Localizing an application involves writing the application in such a way that it can be easily translated to other languages.

The most common method is to keep all strings in an external resource file. Separate files are created for each language, and depending on the language selected by the user, the strings are loaded from the corresponding file on application startup. Separating the strings from the source code is important. It allows separate translation teams to work on translating the resource files while the developers can focus on application development.

Localization and GNU gettext

GNU gettext is a translation framework that provides a set of utilities for generating resource files and loading translated strings. It supports most common languages like C, C++, C#, Java and Perl and is extremely powerful and simple to use.

GNU gettext and Vala

Adding translation support to a Vala application is pretty simple. We will use the following program to demonstrate the steps involved.

hello.vala

void main() 
{
stdout.printf("This is a sentence in English");
stdout.printf("\n");
}

Localizing a Vala application involves the following steps:

1. Mark the strings to translate.

Source code files usually contain a large number of strings, and not all strings need to be translated. Mark the strings to be translated by enclosing the string in brackets with a leading underscore.

Original line:

stdout.printf("This is a sentence in English"); 

After marking the string:

stdout.printf(_("This is a sentence in English")); 

2. Setting the locale

Add the following lines of code at the start of the application.

Intl.setlocale(LocaleCategory.MESSAGES, "");
Intl.textdomain(GETTEXT_PACKAGE);
Intl.bind_textdomain_codeset(GETTEXT_PACKAGE, "utf-8");
Intl.bindtextdomain(GETTEXT_PACKAGE, "./locale");

GETTEXT_PACKAGE is a string constant that is defined at the top of the source file. You need to define this only once in any one of the source files. Since our app is named hello.vala we will set it to hello.

Now we have the code:

const string GETTEXT_PACKAGE = "hello"; 

void main()
{
Intl.setlocale(LocaleCategory.MESSAGES, "");
Intl.textdomain(GETTEXT_PACKAGE);
Intl.bind_textdomain_codeset(GETTEXT_PACKAGE, "utf-8");
Intl.bindtextdomain(GETTEXT_PACKAGE, "./locale");

stdout.printf(_("This is a sentence in English"));
stdout.printf("\n");
}

Save it as hello.vala and compile it with the command:

valac -X -DGETTEXT_PACKAGE="hello" hello.vala

Note the additional parameters that we are passing to the vala compiler. The -X and -D options need to be specified before the source file name.

Extracting the strings

Extract the marked strings from the source file with the following command:

xgettext --language=C --keyword=_ --escape --sort-output -o hello.pot hello.vala

The xgettext utility parses the hello.vala source file and writes all marked strings to a file named hello.pot. A POT file (Portable Object Template) is a template file that contains a pair of strings for each string that is extracted from the source file. Since our program contains a single string, the POT file will have the following:

msgid "This is a sentence in English"
msgstr ""

msgid is the original string. It is used as an identifier.
msgstr is the translated string.

Creating a translation

Let's create a French translation for our app.

Run the following command to create a folder for storing translation files:

mkdir -p locale/fr_FR/LC_MESSAGES

The folders are named according to the following naming convention:
<2-letter-language-code>_<2-letter-region-code>/LC_MESSAGES

Run the following command to create a translation file (PO) from the template file (POT):

msginit -l fr_FR -o locale/fr_FR/LC_MESSAGES/hello.po -i hello.pot

Open the generated file hello.po in a text editor. Update the msgstr value and save the file.

hello.po

msgid "This is a sentence in English"
msgstr "Cette phrase est en français"

The translation file needs to be compiled before it can be used by the app. Run the following command to compile the PO file.

cd locale/fr_FR/LC_MESSAGES
msgfmt --check --verbose -o hello.mo hello.po

This generates a file hello.mo which is in machine-readable (binary) format.

That's it. We're all done.

Testing the translation

First install the support packages for the French language on your system.
Run the following command in terminal window:

sudo aptitude install -y language-pack-fr

Wait while the language packs are downloaded and installed.

Run the following command for changing the current locale:

export LANGUAGE=fr_FR.UTF-8

Run the program in the same terminal window:

./hello

Notes

const string GETTEXT_PACKAGE = "hello"; 

void main()
{
Intl.setlocale(LocaleCategory.MESSAGES, "");
Intl.textdomain(GETTEXT_PACKAGE);
Intl.bind_textdomain_codeset(GETTEXT_PACKAGE, "utf-8");
Intl.bindtextdomain(GETTEXT_PACKAGE, "./locale");

stdout.printf(_("This is a sentence in English"));
stdout.printf("\n");
}

The bindtextdomain() function sets the search directory for the translation files. Since we created the directory locale for keeping translation files, we are binding the text domain to the path ./locale. If we install the MO files to the default system path /usr/share/locale, then there is no need to call the bindtextdomain() function.

CPU Panel for Conky

$
0
0

Simple Theme for Conky

A simple theme to monitor CPU, RAM and Network speed.

Simple Theme Download

CPU Panel

A panel for monitoring CPU loads. The load on each core is shown as a graph along with the frequency. The top-most graph displays the average/total load.

For 8-core CPU: Download

For 6-core CPU: Download

For 4-core CPU: Download

For 2-core CPU: Download

How to use these themes

Install conky on your Debian/Ubuntu/LinuxMint system. Open a terminal window and type the following command:

sudo apt-get install conky conky-all

Save the theme file to your home folder and run it with the following command:

Example:

conky -c "$HOME/conky-themes/tg-simple.conkyrc"

To run conky at system startup, use the Startup Applications tool from the Applications menu and add an entry for the command given above.

Moving the Panels:

In order to move the panel to a different position, edit the gap_x and gap_y values in the conkyrc file. The gap_x value is the horizontal distance (in pixels) from the top-left edge of the screen. The gap_y value is the vertical distance (in pixels) from the top-left edge of the screen. Edit these values to move the panel to a different position on your desktop.

Updates:

[2013-05-03] Added CPU frequency info for each core

A Guide to Linux System Backups

$
0
0

In this article I'm going to show you a quick and painless way of taking regular backups of your Linux system. The backups will be completely automated and will not require any attention on your part. So when the day comes when your system finally fails due to a corrupted partition, damaged hard disk, or software issues, you can simply go back in time and restore your system to the way it was on particular day.

A Note about Parted Magic

We all use Parted Magic for taking system backups. It's an amazing utility for system rescue and recovery. Once you boot into the Live CD you can use the Clonezilla tool to backup, restore and duplicate entire partitions. While backing up your system using Parted Magic is very easy, it is not a good substitute for regular system backups. It is not practical to boot the live CD everyday for taking a system backup. Basically, the idea is that if it takes any effort on your part - you're not going to do it. Or you may do it once a month, or when you remember, but when your system finally dies you will feel like doing a fresh installation instead of restoring an old backup. The method shown below is completely automated, does not require much disk space and takes just a few seconds to back up your system.

The only thing we need for this is a portable hard disk with a Linux partition. If you don't have a Linux partition you can create one easily by resizing an existing partition and creating a new one. Format the new partition to ext2, ext3 or ext4. You can do this using the gparted tool (install it with the command 'sudo aptitude install gparted') or use the Parted Magic Live CD.

Step-1: Install rsnapshot

rsnapshot is the tool that we will use to make our backups. rsnapshot is a simple tool that uses rsync to copy all files on your system partition to your backup partition (on the portable HDD or network location). The first backup will take a few minutes since all files have to be copied to backup location. After that, whenever you take your next backup, rsnapshot will simply hard-link all files from the previous backup and copy only those files that have changed.

A Note about Hard-Links

On a Linux partition it is possible for one file to be present in more than one folder. So if you have 2 folders (say folder1 and folder2) and if you have a file named file.txt of size 1MB in folder1, then you can create a hard-link to the file in folder2. Both folders will display a file named file.txt of size 1MB but since both file are the same, the file takes up only 1MB of disk space. If you edit the file in folder1 you will see the changes in the file in folder2 (since they are the same file). Deleting one file does not delete the other. The file will be removed from the disk only after all links have been deleted.

Install rsnapshot by running the following command in a terminal window (CTRL+ALT+T):

sudo aptitude install -y rsnapshot

Step-2: Prepare the Portable Hard Disk

Create an ext4 partition on the portable disk using gparted or the Parted Magic Live CD. The partition must be at least as big as your system partition. Set the partition label to sysdumps. Setting the label is important since it ensures that the disk will always be auto-mounted to the same folder. For example, if you set the partition label to sysdumps it will always be mounted to the folder /media/<username>/sysdumps when you connect it to your Ubuntu/LinuxMint/Debian system. Here's a screenshot showing how to set the label using gparted or Parted Magic (right-click on the partition, click 'Unmount', right-click again, click 'Label', enter the label as 'sysdumps' then click the 'Apply' button on the tool bar.

Unmmount the partitionSet the new label

  • Unplug the portable disk and connect it again.

  • Create a folder named backups:

    mkdir /media/$USER/sysdumps/backups
  • Create 2 scripts named backup.sh and backup-daily.sh
    touch /media/$USER/sysdumps/backup.sh
chmod a+x backup.sh
touch /media/$USER/sysdumps/backup-daily.sh
chmod a+x backup-daily.sh
  • Edit backup-daily.sh and paste the following:
    rsnapshot -c ./rsnapshot.conf daily
  • Edit backup.sh and paste the following. Replace 'teejee' with your own login id. The purpose of backup.sh is to simply call backup-daily.sh. We will soon see why this is required.
    sudo /media/teejee/sysdumps/backup-daily.sh

The Linux partition on the portable disk will now look like this:

Step-3: Edit the Config File

Copy the default rsnapshot config file to your backup location:

cp -a /etc/rsnapshot.conf /media/$USER/sysdumps/rsnapshot.conf

Edit it with a text editor and make the following changes:

  • Set the backup location: Replace 'teejee' with your own login id.
    snapshot_root    /media/teejee/sysdumps/backups/
  • Uncomment no_create_root: Uncomment the line given below. This will prevent rsnapshot from trying to create the backup directory when it doesn't exist (when the portable disk is unplugged).
    no_create_root   1
  • Set the backup intervals and the number of backups to keep: Since we will take daily backups, we need to comment-out the other lines. The number 10 specifies that a maximum of 10 backups will be maintained in the backup location.
    #retain      hourly  6
retain daily 10
#retain weekly 4
#retain monthly 3
  • Set the files and folders to exclude from backup: The reason why we are excluding these folders is because the contents of these folders are dynamic. The contents are populated when the system boots. Backing-up and restoring these folders can cause problems. Also note that we are excluding the contents of these folders, not the folders themselves.
    exclude  /dev/*
exclude /proc/*
exclude /sys/*
exclude /media/*
exclude /mnt/*
exclude /tmp/*
exclude /run/*
exclude /var/run/*
exclude /var/lock/*
exclude /lost+found
  • Set the source folders: We will back up the entire root directory (/).
    # LOCALHOST
backup / localhost/

Step-4: Take the First Backup

Run the script backup.sh by double-clicking the file. If you get a pop-up like the one shown below, click on the button Run in Terminal. Enter the Admin password when prompted.

Wait for the script to finish. Window will close automatically after a few minutes. All files in your root directory (/) will get copied to a folder named daily.0 in the backup location.

The first backup takes the most time since all files have to be copied to the backup location. All backups after that will only take few seconds. Existing files will be hard-linked from the previous backup and only new and changed files will be copied.

Run the backup script again by double-clicking the file. It will complete in a few seconds and create another folder daily.1 in the backup location. Both the folders daily.0 and daily.1 contain a full system backup. But since the files are hard-linked, both backups will take the same disk space as a single backup.

Step-5: Automate the Backups

Install gnome-scheduler with the following command:

sudo aptitude install -y gnome-scheduler

Start Gnome Scheduler and add a scheduled task to run at system startup:

If you run this task using the toolbar button you will notice that it asks for the Admin password. Since this is an automated task, we need to make some changes so that it doesn't ask for the password when it runs.

Edit the /etc/sudoers file using the following command:

sudo gedit /etc/sudoers

Add the following line at the end of the file (replace 'teejee' with your own login id):

teejee ALL = NOPASSWD: /media/teejee/sysdumps/backup-daily.sh

Save and close the file. This entry will allow the command 'sudo /media/teejee/sysdumps/backup-daily.sh' to run without prompting for the Admin password. This is the exact command that we have put in the 'backup.sh' file. Now the file 'backup.sh' can be executed by any user without getting the prompt for the Admin password.

Step-6: Forget about it!

Your system will get backed up to the portable disk whenever you boot your PC. You won't know about about it and you don't need to worry about it. You can keep the portable disk connected to your system. If the disk is not connected the backup will fail silently. Next backup will be taken whenever the system starts with the portable disk connected. You will have 10 backups of your system at any time. You can set a higher number in the config file without worrying about disk space.

NVIDIA Panel for Conky

$
0
0

Displays the following information for NVIDIA cards:

  • GPU Temperature
  • Fan Speed
  • GPU Clock
  • Memory Clock
  • Memory Usage

Download

Vala #7: Process Execution

$
0
0

One of the best things about Linux programming is code-reusability. You can simply call a function in a library or execute a command to get a task done, instead of writing the code from scratch. Since there is a command in Linux for almost every task, it greatly reduces the effort required to develop a program. In this article we will see how Linux commands can be executed as a background process for performing various tasks in a Vala program.

Process.spawn_command_line_sync


public bool spawn_command_line_sync ( string command_line,
out string standard_output = null,
out string standard_error = null,
out int exit_status = null
)
throws SpawnError

The simplest way to execute a process is to call the spawn_command_line_sync function. The first parameter is the command to be executed, the second and third parameters return the data of the StandardOutput and StandardError streams and the fourth parameter returns the exit code. Only the first parameter (the command to execute) is mandatory. We can pass null for the remaining parameters which are optional.

Let's wrap this in a wrapper function to make it easier to use:

Execute a command and get the exit code

public int execute_command_sync (string cmd)
{
try {
int exitCode;
Process.spawn_command_line_sync(cmd, null, null, out exitCode);
return exitCode;
}
catch (Error e){
log_error (e.message);
return -1;
}
}

This function executes a command and returns the exit code. Note that we have wrapped the function call spawn_command_line_sync in a try..catch block since the function is declared to throw an error of type SpawnError. The standard_output and standard_error arguments are null since we are not interested in the output of the command. We are only interested in the exit code which will indicate if the command was executed successfully. Exit code 0 indicates success. Non-zero values indicate errors and warnings.

Examples:

  • Delete a file:
execute_command_sync("rm /path/file");
  • Eject the CD-ROM tray:
execute_command_sync("eject");
  • Turn off the monitor ;). Monitor will turn back on when the mouse is moved or a key is pressed.
execute_command_sync("xset dpms force off");

Since Linux has a command for everything, you can perform an endless number of tasks with this function.

Execute a command and get the output

public string execute_command_sync_get_output (string cmd)
{
try {
int exitCode;
string std_out;
Process.spawn_command_line_sync(cmd, out std_out, null, out exitCode);
return std_out;
}
catch (Error e){
log_error (e.message);
return "";
}
}

This function executes a command and returns the output of the command as a string.

Examples:

  • Find the process ID of a process (the process ID is useful for killing or freezing the process and changing process priority):
execute_command_sync_get_output("pidof firefox") //Returns the process ID number
  • Get the path of a command:
execute_command_sync_get_output("which firefox");  //Returns /usr/bin/firefox 

Process.spawn_async

The function Process.spawn_command_line_sync is synchronous, i.e. the program will wait for the command to finish before moving to the next line in the code. To execute a process asynchronously (without waiting) we can use the function Process.spawn_async.


public bool spawn_async ( string? working_directory,
string[] argv,
string[]? envp,
SpawnFlags _flags,
SpawnChildSetupFunc? child_setup,
out Pid child_pid
)
throws SpawnError

The function usage is a little tedious, so let's move to the wrapper function.

Execute a command without waiting

public bool execute_command_async (string[] args)
{
try {
Process.spawn_async(null, args, null, SpawnFlags.SEARCH_PATH, null, null);
return true;
}
catch (Error e){
log_error (e.message);
return false;
}
}

This function executes a process and returns without waiting for the process to finish. The name of the process to execute and the argument are passed as an array of strings.

Examples:

  • Shutdown the system after 5 minutes:
execute_command_async(new string[]{"shutdown", "-h", "+5"});

Vala #8: Useful Functions

$
0
0

1) Get Process ID

public int get_pid_by_name (string name)
{
try{
string output = "";
Process.spawn_command_line_sync("pidof \"" + name + "\"", out output);
if (output != null){
string[] arr = output.split ("\n");
if (arr.length > 0){
return int.parse (arr[0]);
}
}
}
catch (Error e) {
log_error (e.message);
}

return -1;
}

This function returns the process ID of the first running instance. You can modify this function to return an array of process IDs for all running instances.

Example:

Pid firefox_id = get_pid_by_name("firefox");


2) Find all child processes invoked by a process

public int[] get_process_children (Pid parentPid)
{
string output;

try {
Process.spawn_command_line_sync("ps --ppid " + parentPid.to_string(), out output);
}
catch(Error e){
log_error (e.message);
}

int pid;
int[] procList = {};
string[] arr;

foreach (string line in output.split ("
")){
arr = line.strip().split (" ");
if (arr.length < 1) { continue; }

pid = 0;
pid = int.parse (arr[0]);

if (pid != 0){
procList += pid;
}
}
return procList;
}

This function returns an array of IDs for all processes which were started by the parent process. If you pass the process ID of a running batch script, you will get an array of process IDs for all processes that were started by the batch script. This list can be used to terminate the batch script and the processes invoked by it.


3) Kill a process and its children

public void process_kill(Pid process_pid, bool killChildren = true)
{
long[] child_pids = get_process_children (process_pid);
Posix.kill (process_pid, 15);

if (killChildren){
Pid childPid;
foreach (long pid in child_pids){
childPid = (Pid) pid;
Posix.kill (childPid, 15);
}
}
}

Example:

  • Kill firefox browser:
Pid firefox_id = get_pid_by_name("firefox");
process_kill(firefox_id, true);


4) Freeze and Un-Freeze a process

public int process_pause (Pid procID)
{
return execute_command_sync ("kill -STOP " + procID.to_string());
}

public int execute_command_sync (string cmd)
{
try {
int exitCode;
Process.spawn_command_line_sync(cmd, null, null, out exitCode);
return exitCode;
}
catch (Error e){
log_error (e.message);
return -1;
}
}

This will freeze the process. Useful for pausing a process that is using a lot of CPU. Please note that you need to un-freeze the process before you can kill it.

public int process_resume (Pid procID)
{
return execute_command_sync ("kill -CONT " + procID.to_string());
}

This will un-freeze the process and it will continue from the same point.


5) Display notification bubble in system tray

public int notify (string title, string message, int durationMillis, string urgency)
{
string s = "notify-send -t %d -u %s -i %s \"%s\" \"%s\"".printf(durationMillis, urgency,
Gtk.Stock.INFO, title, message);
return execute_command_sync (s);
}

This function displays a notification bubble in the system tray for the specified duration. The urgency parameter accepts values "low","normal" and "critical".

Example:

notify("Example","This notification bubble will be displayed for 10 seconds", 10000, "low");


Xubuntu 13.04 - Tips and Troubleshooting

$
0
0

I recently switched to Xubuntu 13.04 after using Linux Mint for nearly a year. While Linux Mint with Cinnamon desktop is a very good system, the Xubuntu desktop is more lightweight. The fonts look prettier with better anti-aliasing, the startup is much faster and the system somehow feels more powerful. Here's how you can make the most of your new Xubuntu system.

Enable Dropdown Terminal

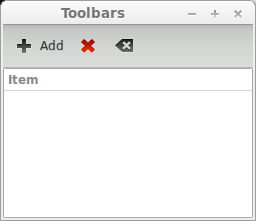
The latest Xfce Terminal v0.6 features a drop-down terminal mode similar to other drop-down consoles like Guake and Terra. The terminal will appear when you press a key on your keyboard and hide when it loses focus. You can run a command and leave it running while you switch to another window. It supports multiple tabs which allows you to run multiple commands at once.

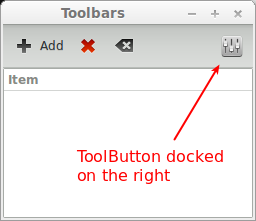
In order to start the terminal in drop-down mode, you need to pass the parameter "--drop-down" when the terminal is launched. Go to Settings Manager > Keyboard > Application shortcuts, click Add and add the command "xfce4-terminal --drop-down". Click "OK" and press any key to assign a keyboard shortcut for opening the drop-down terminal (I'm using F1). Close the window and press the keyboard shortcut (F1) to launch the terminal. If you open the Preferences dialog, a new tab called "Dropdown" will be visible for changing window position, opacity, and other options.

Reduce Panel Autohide Delay

The taskbar panel at the top of the Xfce desktop takes a long time to show and hide when the auto-hide option is enabled. You can reduce the delay so that the panel appears and disappears immediately.

Run the following in a terminal window:

echo '
style "xfce-panel-window-style"
{
# Time in miliseconds before the panel will unhide on an enter event
XfcePanelWindow::popup-delay = 10

# Time in miliseconds before the panel will hide on a leave event
XfcePanelWindow::popdown-delay = 10
}
class "XfcePanelWindow" style "xfce-panel-window-style"
' >> ~/.gtkrc-2.0

Hotcorners, Scale and more

There's an application called brightside which can be used to setup hot corners in Gnome and other desktops. Sadly it does not work with Xfce. The only option is to install Compiz and use the Commands plugin.

Install Compiz by running the following in a terminal window:

sudo apt-get install compiz compiz-plugins compizconfig-settings-manager dconf-tools

Before starting Compiz we need to change the default theme. The default theme is Adwaita which is not installed by default in Xubuntu.

  • Run dconf-editor from the Application menu or by presssing ALT+F2
  • Navigate to /org/gnome/desktop/wm/preferences
  • Edit the key theme. Change the value from Adwaita to Greybird.

Press ALT+F2 and run the following command to start Compiz:

compiz --replace ccp

Your desktop will still look the same. Open a window and minimize it. You will see an animation effect which shows that compiz is working.

Press ALT+F2 and run the following command to start CompizConfig Settings Manager:

ccsm

Most of the important plugins will be enabled by default. You can enable the following for some extra eye candy.

Wobbly Windows

Makes all windows wobble like jelly. Un-check the Snapping Windows plugin and check Wobbly Windows.

Scale Windows

The Scale plugin is already enabled by default. You can bind it to a screen corner from the bindings tab as shown below.

Moving the mouse to the bottom-left corner of the screen will scale all open windows.

Coverflow ALT+TAB

Enable the ShiftSwitcher plugin and change the binding for action Next Window to ALT+TAB.

Press ALT+TAB to chose between open windows.

HotCorners

Use the Commands plugin to execute commands when the mouse pointer moves to a corner of the screen.

Setting Compiz as the default window manager

Once everything is set up and Compiz seems to be running fine, you can set Compiz to start automatically at system startup. Compiz will replace the default window manager for Xfce (xfwm4).

Run the following commands in a terminal window:

cp /etc/xdg/xfce4/xfconf/xfce-perchannel-xml/xfce4-session.xml ~/.config/xfce4/xfconf/xfce-perchannel-xml/xfce4-session.xml
mousepad ~/.config/xfce4/xfconf/xfce-perchannel-xml/xfce4-session.xml

Modify the tag 'Client0_Command' as shown below. Change 'xfwm4' to 'compiz' and add an entry for 'ccp'.

<property name="Client0_Command" type="array">
<value type="string" value="compiz"/>
<value type="string" value="ccp"/>
</property>

In order to go back to the 'xfwm4' window manager, simply edit the file again and undo the above changes.

Trouble-Shooting


Compiz: Windows borders disappear

Press ALT+F2 and run the following command:

compiz-decorator --replace

If the window borders keep disappearing repeatedly, it indicates that there is an issue with plugin configuration. Open the CompizConfig Settings Manager (ccsm), reset the settings to default, and try to configure the plugins again.

Compiz: Hot-corner does not work for scale plugin

Sometimes the hot corner may not work due to other Compiz plugins which take focus away from the Scale plugin. It case it doesn't work, please try the following:

  • Run dconf-editor from the Application menu or by presssing ALT+F2
  • Navigate to /org/compiz/profiles/Default/plugins/core
  • Edit the key active-plugins. Move 'scale' to the end of the list.


Compiz: Windows buttons stop responding

There is an open bug in Ubuntu 13.04 which can cause the window border buttons to stop responding when an application is started in a maximized state. The issue occurs only with maximized windows and affects both the gtk-window-decorator and kde-window-decorator. The only work-around currently known is to turn off the Metacity themes for the gtk-window-decorator.

To turn off Metacity theme do the following:

  • Run dconf-editor from the Application menu or by presssing ALT+F2
  • Navigate to /org/compiz/gwd
  • Edit the key use-metacity-theme and set it to False

Please note that this will result in blue window borders and there is NO way to change the default theme. Hopefully this bug will be fixed soon.

Compiz: Settings are not saved

Sometimes the changes are not saved when you exit the CompizConfig Settings Manager. If you face this issue, go to Preferences and change the Backend to GSettings Configuration Backend.

Xfce Panel: Auto-hide stops working for top panel

There's an open bug in Xfce 4.10 in which the auto-hide stops working for the top panel. If you have set the top panel to auto-hide, the auto-hide will stop working sometimes and the panel will overlap the title bar of the maximixed windows. If you face this issue run the following command with ALT+F2. It will re-load the Xfce panels.

xfce4-panel -r

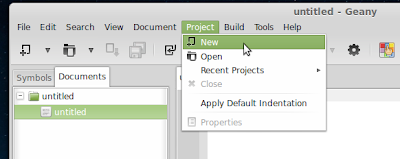
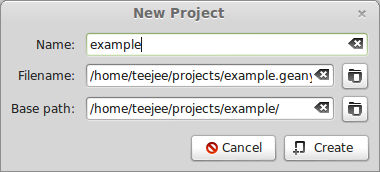
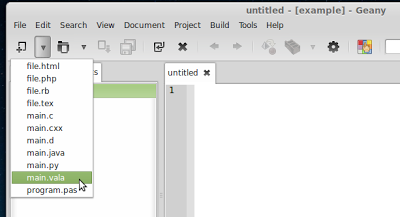
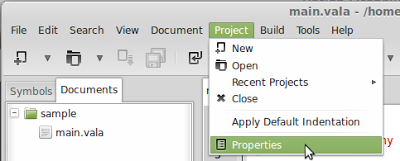
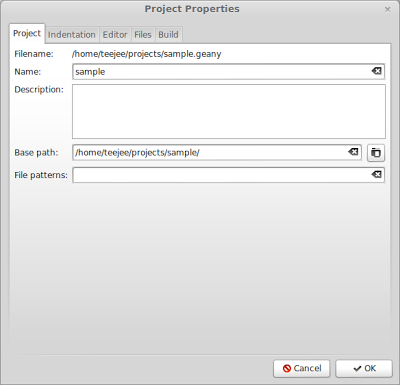
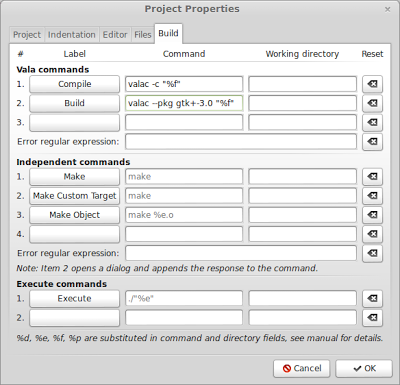
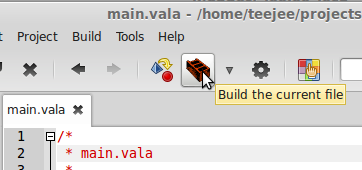
Vala Compiler Errors

Compiling a Vala program which uses any math function like Floor(), Round(), etc will result in a linker error similar to the one shown below:

/usr/bin/ld: /tmp/ccCvDHTZ.o: undefined reference to symbol 'floor@@GLIBC_2.0'
/usr/bin/ld: note: 'floor@@GLIBC_2.0' is defined in DSO /lib/i386-linux-gnu/libm.so.6 so
try adding it to the linker command line
/lib/i386-linux-gnu/libm.so.6: could not read symbols: Invalid operation

The math library libm was linked automatically in previous Ubuntu releases. But from now onwards the math library needs to be linked explicitly. Add the extra option --Xcc="-lm" when you compile your Vala programs.

Example:

valac --Xcc="-lm" main.vala

Network Issues - Disable IPv6

If your network manager keeps disconnecting or if you are unable to open any pages in your browser, then try the following:

  • Press ALT+F2 and run the command:
    gksu gedit /etc/sysctl.conf
  • Append the following lines at the end of the file. Save and Close the file.
    # IPv6
    net.ipv6.conf.all.disable_ipv6 = 1
    net.ipv6.conf.default.disable_ipv6 = 1
    net.ipv6.conf.lo.disable_ipv6 = 1
  • Press ALT+F2 and run the command:
    sudo sysctl -p

This will disable IPv6 on your system. Please don't do this if your system is working fine. It is only required in some countries where the ISPs don't yet support IPv6 fully. When IPv6 is enabled the system first sends a request using IPv6 (thinking that the ISP supports it). The ISP does not relay the request and the request times-out. The system then sends an IPv4 request which succeeds. This causes the web browser to lag whenever it tries to access any page. Visit the site test-ipv6.com to test the IPv6 support of your ISP.

Article Updates

2013-05-27 Added work-around for top panel auto-hide issue

Introducing Conky Manager

$
0
0

I had some free time this weekend and so I quickly coded a small app for managing Conky scripts. It displays a list of Conky themes installed on your system and allows the user to start and stop specific themes. It also has an option to start Conky on system startup.

Installation

If you are using Ubuntu 12.04, 12.10, 13.04 (or any of its derivates like Kubuntu, Xubuntu, Linux Mint) then you can install it from the LaunchPad PPA:

Open a terminal window (CTRL+ALT+T) on your machine and type the following commands one by one:

sudo apt-add-repository -y ppa:teejee2008/ppa
sudo apt-get update
sudo apt-get install conky-manager

For other Debian systems the DEB package can be download from LaunchPad.net

How it works

Themes are kept in the ~/conky-manager directory. Each sub-folder in this location will be displayed as a separate theme. The folder name becomes the theme title. Selecting a theme from the top list will display the conkyrc files in the bottom list. Click the checkboxes in the top list or the bottom list to start or stop a theme.

The Options tab has an option to start Conky on system startup. It creates an autostart entry in ~./.config/autostart when checked, and removes the file when un-checked. The actual startup script is written to ~/conky-manager/conky-startup.sh. This script will be updated when the app exits.

How to package a theme

A few themes have been packaged with the app. In order to add themes a few rules must be followed.

  1. Each sub-folder in the location ~/conky-manager will be displayed as a separate theme. The folder name will be displayed as the theme name and the folder will be set as the working-directory for Conky.

  2. All .conkyrc files must be kept in a sub-folder named config. All files in this location will be treated as .conkyrc files. The .conkyrc file extension is not mandatory. The config files can also be kept directly in the base folder if the files have a .conkyrc extension.

  3. The .conkyrc files should not have any hard-coded paths. All paths must be relative to the base folder.

  4. Fonts must be kept in a sub-folder named fonts. Fonts from this location will be automatically installed to ~/.fonts when the user starts the theme.

  5. The preview image (optional) must be named preview.png and kept in the base folder.

  6. The credits and other information for the theme can be specified in the file info.txt placed in the base folder.

Reporting Bugs

The project is hosted on Launchpad: https://launchpad.net/conky-manager
Bugs can be reported on the Launchpad bug tracker.

More features are planned and more themes will be added soon. Suggestions are welcome.

Conky Manager v1.1

$
0
0

Conky Manager is a graphical front-end which provides options to start/stop, browse and edit Conky themes installed on the system. It is currently in development. Leave a comment on my blog or mail me if you have any suggestions or feature requests.

Project Page:https://launchpad.net/conky-manager
PPA:https://launchpad.net/~teejee2008/+archive/ppa
Contact: Tony George (teejee2008@gmail.com)


What's New

A new tab has been added for editing Conky config files. This tab provides options for changing basic settings like the location of the widget on the desktop, transparency and size of the window.

Location Tab:

Set alignment and gap from screen borders.

Transparency Tab:

Set the widget background color and transparency.

Size Tab

Set the minimum size of the widget.

New Themes

Following new themes have been added to the download package.

Gotham

Max Conky

Torn Paper Clone

CPU Panel

NVIDIA Panel

Options Tab

Starting with this version, the new themes that are installed will not be copied automatically to your local conky directory (~/conky-manager/themes). There's a new button in the Options tab for copying the new themes. Existing themes will not be overwritten.

Installation

If you are using Ubuntu 12.04, 12.10, 13.04, 13.10 (or any of its derivates like Kubuntu, Xubuntu, Linux Mint) then you can install it from the LaunchPad PPA:

Open a terminal window (CTRL+ALT+T) on your machine and type the following commands one by one:

sudo apt-add-repository -y ppa:teejee2008/ppa
sudo apt-get update
sudo apt-get install conky-manager

For other Debian systems the DEB package can be download from LaunchPad.net

Super Conky Package

$
0
0

There's a new conky theme pack by Jesse Avalos. Jesse has put together some of the best Conky themes into one package. Download link and screenshots are given below.

Themes

Here a preview of some of the included themes:

Video by Jesse

Downloads

Download Super Conky Package from MediaFire (18 MB)

Installation instructions are present in the README file.

Eye Candy Linux Community (Google+)

There's a Conky community at Google+ with some great themes.

Eye Candy Linux

Deluxe Conky Theme Pack

$
0
0

A new Conky theme pack has been released by Jesse Avalos. This is an updated version of the Super Conky Theme Pack with more Conky themes and configs.

Themes

Here's a preview of some of the new themes:

Videos by Jesse

Downloads

Download Deluxe Conky Theme Pack from MediaFire (24 MB)

Installation instructions are present in the README file.

Installation

  • Install Conky Manager by running the following commands in a terminal:
sudo apt-add-repository -y ppa:teejee2008/ppa
sudo apt-get update
sudo apt-get install conky-manager
  • Download and extract the Deluxe Conky Theme Pack.

  • Press CTRL+H to show hidden files and copy the hidden folders .config, .Config and .fonts to your home directory.

  • Copy the sub-folders in Theme folder to the location $HOME/conky-manager/themes

  • Start Conky Manager from the Application Menu and select the themes to activate.

Eye Candy Linux Community (Google+)

There's a Conky community at Google+ with some great themes.

Eye Candy Linux

Viewing all 136 articles
Browse latest View live