In this article I'm going to show you a quick and painless way of taking regular backups of your Linux system. The backups will be completely automated and will not require any attention on your part. So when the day comes when your system finally fails due to a corrupted partition, damaged hard disk, or software issues, you can simply go back in time and restore your system to the way it was on particular day.
A Note about Parted Magic
We all use Parted Magic for taking system backups. It's an amazing utility for system rescue and recovery. Once you boot into the Live CD you can use the Clonezilla tool to backup, restore and duplicate entire partitions. While backing up your system using Parted Magic is very easy, it is not a good substitute for regular system backups. It is not practical to boot the live CD everyday for taking a system backup. Basically, the idea is that if it takes any effort on your part - you're not going to do it. Or you may do it once a month, or when you remember, but when your system finally dies you will feel like doing a fresh installation instead of restoring an old backup. The method shown below is completely automated, does not require much disk space and takes just a few seconds to back up your system.
The only thing we need for this is a portable hard disk with a Linux partition. If you don't have a Linux partition you can create one easily by resizing an existing partition and creating a new one. Format the new partition to ext2, ext3 or ext4. You can do this using the gparted tool (install it with the command 'sudo aptitude install gparted') or use the Parted Magic Live CD.
Step-1: Install rsnapshot
rsnapshot is the tool that we will use to make our backups. rsnapshot is a simple tool that uses rsync to copy all files on your system partition to your backup partition (on the portable HDD or network location). The first backup will take a few minutes since all files have to be copied to backup location. After that, whenever you take your next backup, rsnapshot will simply hard-link all files from the previous backup and copy only those files that have changed.
A Note about Hard-Links
On a Linux partition it is possible for one file to be present in more than one folder. So if you have 2 folders (say folder1 and folder2) and if you have a file named file.txt of size 1MB in folder1, then you can create a hard-link to the file in folder2. Both folders will display a file named file.txt of size 1MB but since both file are the same, the file takes up only 1MB of disk space. If you edit the file in folder1 you will see the changes in the file in folder2 (since they are the same file). Deleting one file does not delete the other. The file will be removed from the disk only after all links have been deleted.
Install rsnapshot by running the following command in a terminal window (CTRL+ALT+T):
sudo aptitude install -y rsnapshot
Step-2: Prepare the Portable Hard Disk
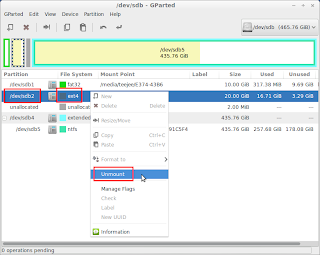
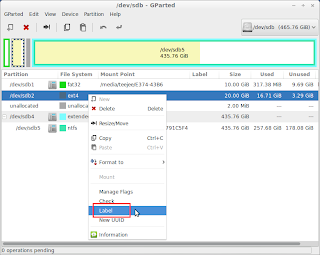
Create an ext4 partition on the portable disk using gparted or the Parted Magic Live CD. The partition must be at least as big as your system partition. Set the partition label to sysdumps. Setting the label is important since it ensures that the disk will always be auto-mounted to the same folder. For example, if you set the partition label to sysdumps it will always be mounted to the folder /media/<username>/sysdumps when you connect it to your Ubuntu/LinuxMint/Debian system. Here's a screenshot showing how to set the label using gparted or Parted Magic (right-click on the partition, click 'Unmount', right-click again, click 'Label', enter the label as 'sysdumps' then click the 'Apply' button on the tool bar.
Unplug the portable disk and connect it again.
Create a folder named backups:
mkdir /media/$USER/sysdumps/backups
- Create 2 scripts named backup.sh and backup-daily.sh
    touch /media/$USER/sysdumps/backup.sh
    chmod a+x backup.sh
    touch /media/$USER/sysdumps/backup-daily.sh
    chmod a+x backup-daily.sh
- Edit backup-daily.sh and paste the following:
rsnapshot -c ./rsnapshot.conf daily
- Edit backup.sh and paste the following. Replace 'teejee' with your own login id. The purpose of backup.sh is to simply call backup-daily.sh. We will soon see why this is required.
sudo /media/teejee/sysdumps/backup-daily.sh
The Linux partition on the portable disk will now look like this:
Step-3: Edit the Config File
Copy the default rsnapshot config file to your backup location:
cp -a /etc/rsnapshot.conf /media/$USER/sysdumps/rsnapshot.conf
Edit it with a text editor and make the following changes:
- Set the backup location: Replace 'teejee' with your own login id.
snapshot_root /media/teejee/sysdumps/backups/
- Uncomment no_create_root: Uncomment the line given below. This will prevent rsnapshot from trying to create the backup directory when it doesn't exist (when the portable disk is unplugged).
no_create_root 1
- Set the backup intervals and the number of backups to keep: Since we will take daily backups, we need to comment-out the other lines. The number 10 specifies that a maximum of 10 backups will be maintained in the backup location.
    #retain      hourly  6
    retain      daily   10
    #retain     weekly  4
    #retain monthly 3
- Set the files and folders to exclude from backup: The reason why we are excluding these folders is because the contents of these folders are dynamic. The contents are populated when the system boots. Backing-up and restoring these folders can cause problems. Also note that we are excluding the contents of these folders, not the folders themselves.
    exclude  /dev/*
    exclude /proc/*
    exclude /sys/*
    exclude /media/*
    exclude /mnt/*
    exclude /tmp/*
    exclude /run/*
    exclude /var/run/*
    exclude /var/lock/*
    exclude /lost+found
- Set the source folders: We will back up the entire root directory (/).
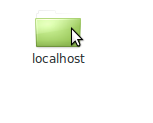
    # LOCALHOST
    backup  /       localhost/
Step-4: Take the First Backup
Run the script backup.sh by double-clicking the file. If you get a pop-up like the one shown below, click on the button Run in Terminal. Enter the Admin password when prompted.
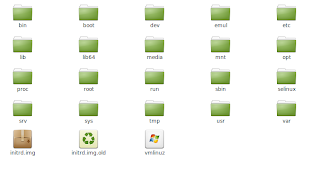
Wait for the script to finish. Window will close automatically after a few minutes. All files in your root directory (/) will get copied to a folder named daily.0 in the backup location.
The first backup takes the most time since all files have to be copied to the backup location. All backups after that will only take few seconds. Existing files will be hard-linked from the previous backup and only new and changed files will be copied.
Run the backup script again by double-clicking the file. It will complete in a few seconds and create another folder daily.1 in the backup location. Both the folders daily.0 and daily.1 contain a full system backup. But since the files are hard-linked, both backups will take the same disk space as a single backup.
Step-5: Automate the Backups
Install gnome-scheduler with the following command:
sudo aptitude install -y gnome-scheduler
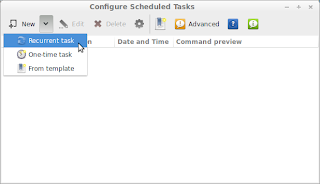
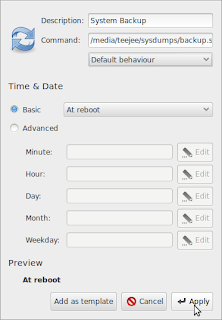
Start Gnome Scheduler and add a scheduled task to run at system startup:
If you run this task using the toolbar button you will notice that it asks for the Admin password. Since this is an automated task, we need to make some changes so that it doesn't ask for the password when it runs.
Edit the /etc/sudoers file using the following command:
sudo gedit /etc/sudoers
Add the following line at the end of the file (replace 'teejee' with your own login id):
teejee ALL = NOPASSWD: /media/teejee/sysdumps/backup-daily.sh
Save and close the file. This entry will allow the command 'sudo /media/teejee/sysdumps/backup-daily.sh' to run without prompting for the Admin password. This is the exact command that we have put in the 'backup.sh' file. Now the file 'backup.sh' can be executed by any user without getting the prompt for the Admin password.
Step-6: Forget about it!
Your system will get backed up to the portable disk whenever you boot your PC. You won't know about about it and you don't need to worry about it. You can keep the portable disk connected to your system. If the disk is not connected the backup will fail silently. Next backup will be taken whenever the system starts with the portable disk connected. You will have 10 backups of your system at any time. You can set a higher number in the config file without worrying about disk space.
